Getting Started
Navigate to Tests / Campaigns > Create Campaign.
This will open the Campaign Wizard. The Campaign Wizard is the central location where you can configure individual simulated phishing tests or campaigns which contain multiple tests to be executed at the time of your choosing.
At each step of the campaign wizard, when you click the "Save & Next" button, the state of your campaign configuration will be saved, and you will be able to continue editing where you left off at a later time.
Campaign Type
The first page of campaign creation is where you choose the type of campaign you are creating.
Phishing - A phishing campaign is a simulation of a real-life phishing attack against your targets. The emails sent in a phishing campaign are meant to be deceptive. You will use phishing email templates in a phishing campaign.
Training - A training campaign is meant to train your users. Targets cannot fail a training campaign (only email open, reported, and viewed training page actions will be recorded for training campaigns).
Campaign Setup
The first step in configuring a campaign is the Campaign Setup stage. Here you will give your campaign a name, choose a group(s) for testing, and schedule simulated phishing emails or training emails for sending.
Campaign Name: Choose a name for the campaign. We recommend naming your campaigns descriptively, e.g., "All employees Q4 2019".
You will also choose a selection type; by group or by account (reseller only).
Group(s): Select the group(s) that you wish to test. If you select multiple groups for testing, you will not be able to omit individual targets in the groups being tested. However, you will still be able to exclude targets using filter parameters at the Target Selection stage.
If you select a single group, you will have the option of choosing individual targets or the entire group. If you wish to select targets from a group for testing, make sure to select "Yes" on the respective select switch.
Courses: Switch course auto-enrollment on or off for failing targets. If this is on, targets that fail the simulated phishing test will automatically be enrolled in the courses of your choosing. If this option is enabled, it will reveal the Course Auto-Enroll step in the campaign creation wizard. Auto-enroll is only available for phishing tests, not training tests.
Frequency: Specify whether you would like the test to run one time or repeat in the future, the number of repetitions, and how often you would like the test to recur. If recurring is selected, additional fields will appear where you can configure intervals. Select from weekly, bi-weekly (every two weeks), monthly, and quarterly. The default is set to repeat weekly one time. You will need a different phishing/training email template(s) for each time the test is run. Repeated tests' settings will be identical to the base test, aside from email templates used for testing.

Start Date, Time, & Timezone: Specify a starting date, time, and timezone for the test to begin. Click the calendar or clock icons for an interactive graphical date/time picker widget.
Track Activity: Specify how long you would like to track activity after all of the emails have been sent. The default, and recommended minimum, is one week. After the period specified here ends, the test will no longer track actions on phishing/training emails.
Once you have finished the Campaign Setup stage, be sure to click "Save & Next" to move to the next step of campaign configuration.
Sending: This section contains options related to how you would like the simulated phishing/training emails to be sent.
- If the "Send all emails when the test campaign starts at 'x' per hour" option is checked, then emails will be scheduled to send at the rate specified in the "per hour" field. The emails will be scheduled to send evenly distributed over the hour, per hour, until all the emails in the test have been sent. The default is for 1000 emails to be sent per hour, and the minimum is 10 emails per hour.
If you create a campaign with multiple groups, a test will be created for each group. The email rate limit is set on a per-test basis. For example, if a campaign is testing 10 groups with 100 targets, 1000 emails will be scheduled. If the email rate limit is set to 100, all of the campaign's emails will be sent in the first hour (100/hour for each of the 10 tests containing 100 emails). If the email rate limit is set to 10, all of the campaign's emails will be sent over ten hours (10/hour for each of the 10 tests containing 100 emails). - If the "Send 'x' emails per target over 'y' Business days/weeks/months" option is checked, then the emails will be scheduled to send randomly on the days and hours that you specify. Click the clock icons to view an interactive time picker widget and set the business hours, and check or uncheck the boxes associated with the days of the week that you would like emails to send. The "'x' emails per target" number represents the number of templates you want to send to a target per test; you will need to select the same amount of email templates that you specify in this field for each repeated test.
- Note: If the test is scheduled to begin on a day of the week that you do not wish to send emails, emails will not start sending until a day that you have specified for sending. This is also true for repeated tests. If a start date occurs on an off day, the emails will not send until a selected day of the week has been reached.
- Note: If the test is scheduled to begin on a day of the week that you do not wish to send emails, emails will not start sending until a day that you have specified for sending. This is also true for repeated tests. If a start date occurs on an off day, the emails will not send until a selected day of the week has been reached.
- If the "Send emails at the test start time based on the targets' timezone setting" option is checked, then the emails will begin sending according to the timezone of each target. If no timezone is set for a target, then the emails will go out according to the timezone of the group.
Course Auto-Enroll
If you enabled course auto-enrollment during the Campaign Setup stage, the next step is configuring course auto-enrollment. If you did not select this option, move to the next step: Templates. (Note: The auto-enroll option is only available for phishing campaigns - not training campaigns.)
The course auto-enroll step allows you to auto-enroll targets into selected courses based on their failure type on a group-by-group basis. Each row represents a different group that is being tested. If you have selected courses on the Edit Group page, these will be prepopulated for you here.
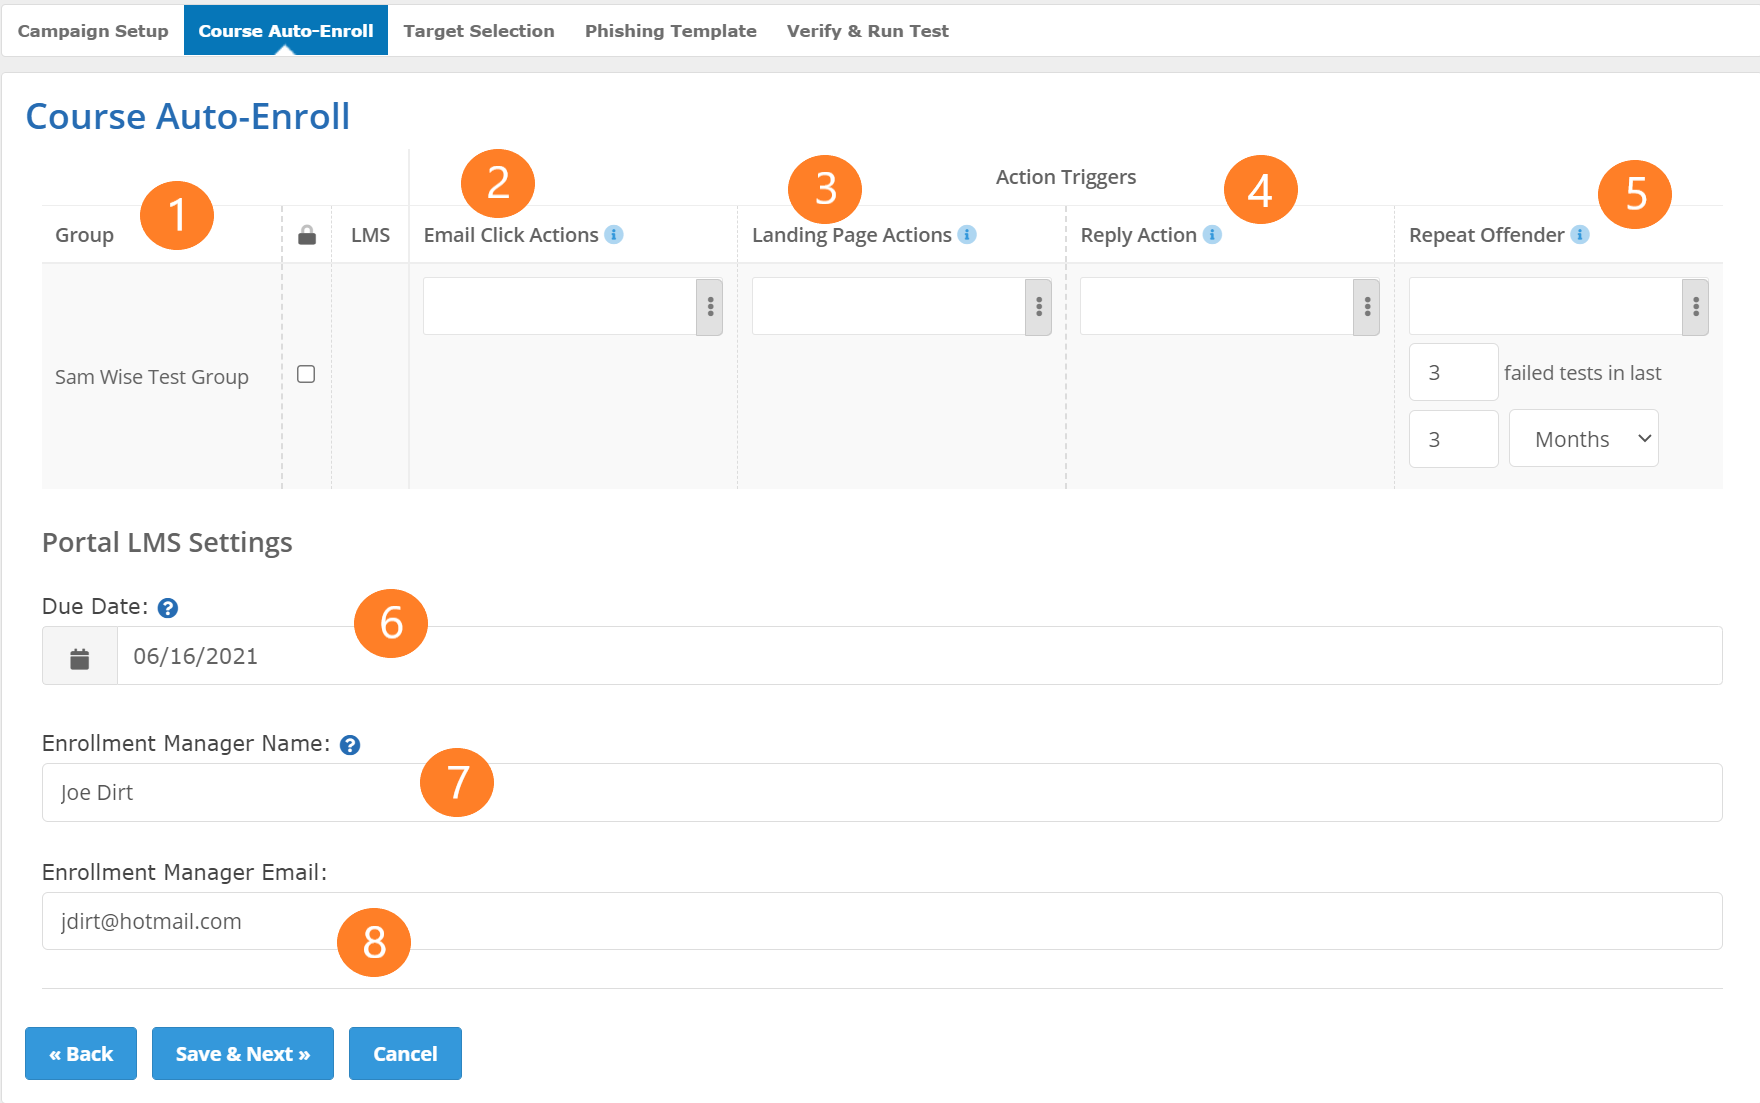
1. Integration Settings Lock: When checked, all the groups with LMS integrations of the same type (Litmos, SmarterU, no LMS integration type, etc.) will collapse on the screen and inherit the same Action Trigger specifications.
2. Email Click Actions: Targets who click links in phishing emails will be enrolled in courses in this column. (Note: Attachment open actions do not count as email click actions.)
3. Landing Page Actions: Targets who enter data or click links on landing pages will be enrolled in courses in this column.
4. Reply Action: Targets who reply to reply-to phishing templates will be enrolled in courses in this column.
5. Repeat Offender: You can specify a course that targets will get enrolled into if they fail x number of tests in the last y weeks/months/years.
6. Due Date: The due date of any courses the targets get enrolled into as a results of failing the campaign.
7. and 8. Enrollment Manager Name/Email: The name/email of the enrollment manager. The enrollment manager will be cc'd on all course enrollment, reminder, and past due emails that get sent to the student.
Once you have selected the courses in which you want to auto-enroll targets, click "Save & Next" to move to the next step of the campaign wizard.
Targets
The targets step will differ depending on whether you selected a single group or multiple groups for testing.
Single Group
1. Target Allotment: This section contains information about target availability for the campaign. Available targets, targets included in the campaign and targets remaining after testing are displayed respectively.
2. Targets: There are several columns that show some information related to the target - the name, sub-group, email address, and last tested date. If some of the targets are selected, an "Assign Sub-Group" button will appear at the bottom of the page. This will let you assign the target to a sub-group.
3. Filter Targets, Add New, Import From...: These buttons allow you to add a new target, filter the existing targets in a group (if you only wish to select certain targets to include in the test), and import a CSV file of target email addresses into the group.
Clicking the Filter Targets button will cause a popup to appear that lets you filter down the targets displayed, based on certain fields.
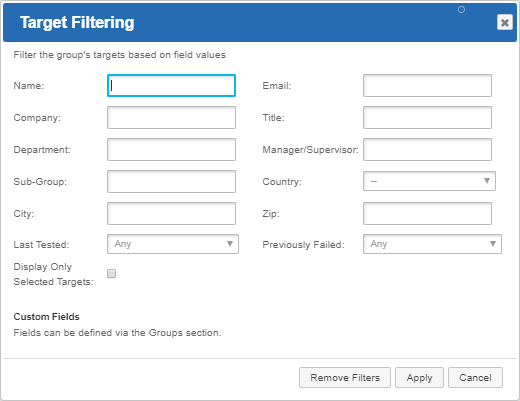
Click the "Apply" button to filter the group based on the desired filters.
Multiple Groups
If you selected multiple groups for testing in the Campaign Setup step, then target selection for multiple groups will be displayed on the Target Selection step.
1. Use Field Filters: If this switch is turned on, you can choose to exclusively test targets in the selected groups based on the criteria entered in this form.
2. Use Mathematical Auto Selection: If this switch is on, you can choose to exclusively test targets in the selected groups based on the criteria in this form.
- By %: Select targets randomly until the given percentage of the targets in all groups have been selected.
- By #: Select targets randomly until the given number of targets have been selected. If you select multiple groups to include in the campaign, then the number of targets will be pulled from each group and included in each test that is scheduled.
- By Confidence Level: Select targets based on the confidence level. Confidence level is a concept in statistics that measures, given a subset of a population, the confidence with which one can measure the variable being tested in the population as a percentage.
After selecting and editing targets as desired, make sure to click "Save & Next" to save your changes and move to the next step.
Phishing/Training Templates
The next step in creating a campaign is selecting the templates you intend to use in the campaign. You can add custom templates you have built or edited in your account, or you can use pre-made templates from the Portal template library. The campaign wizard will do its best to match the locales (languages) offered by the templates you select with the locales of your targets and groups.
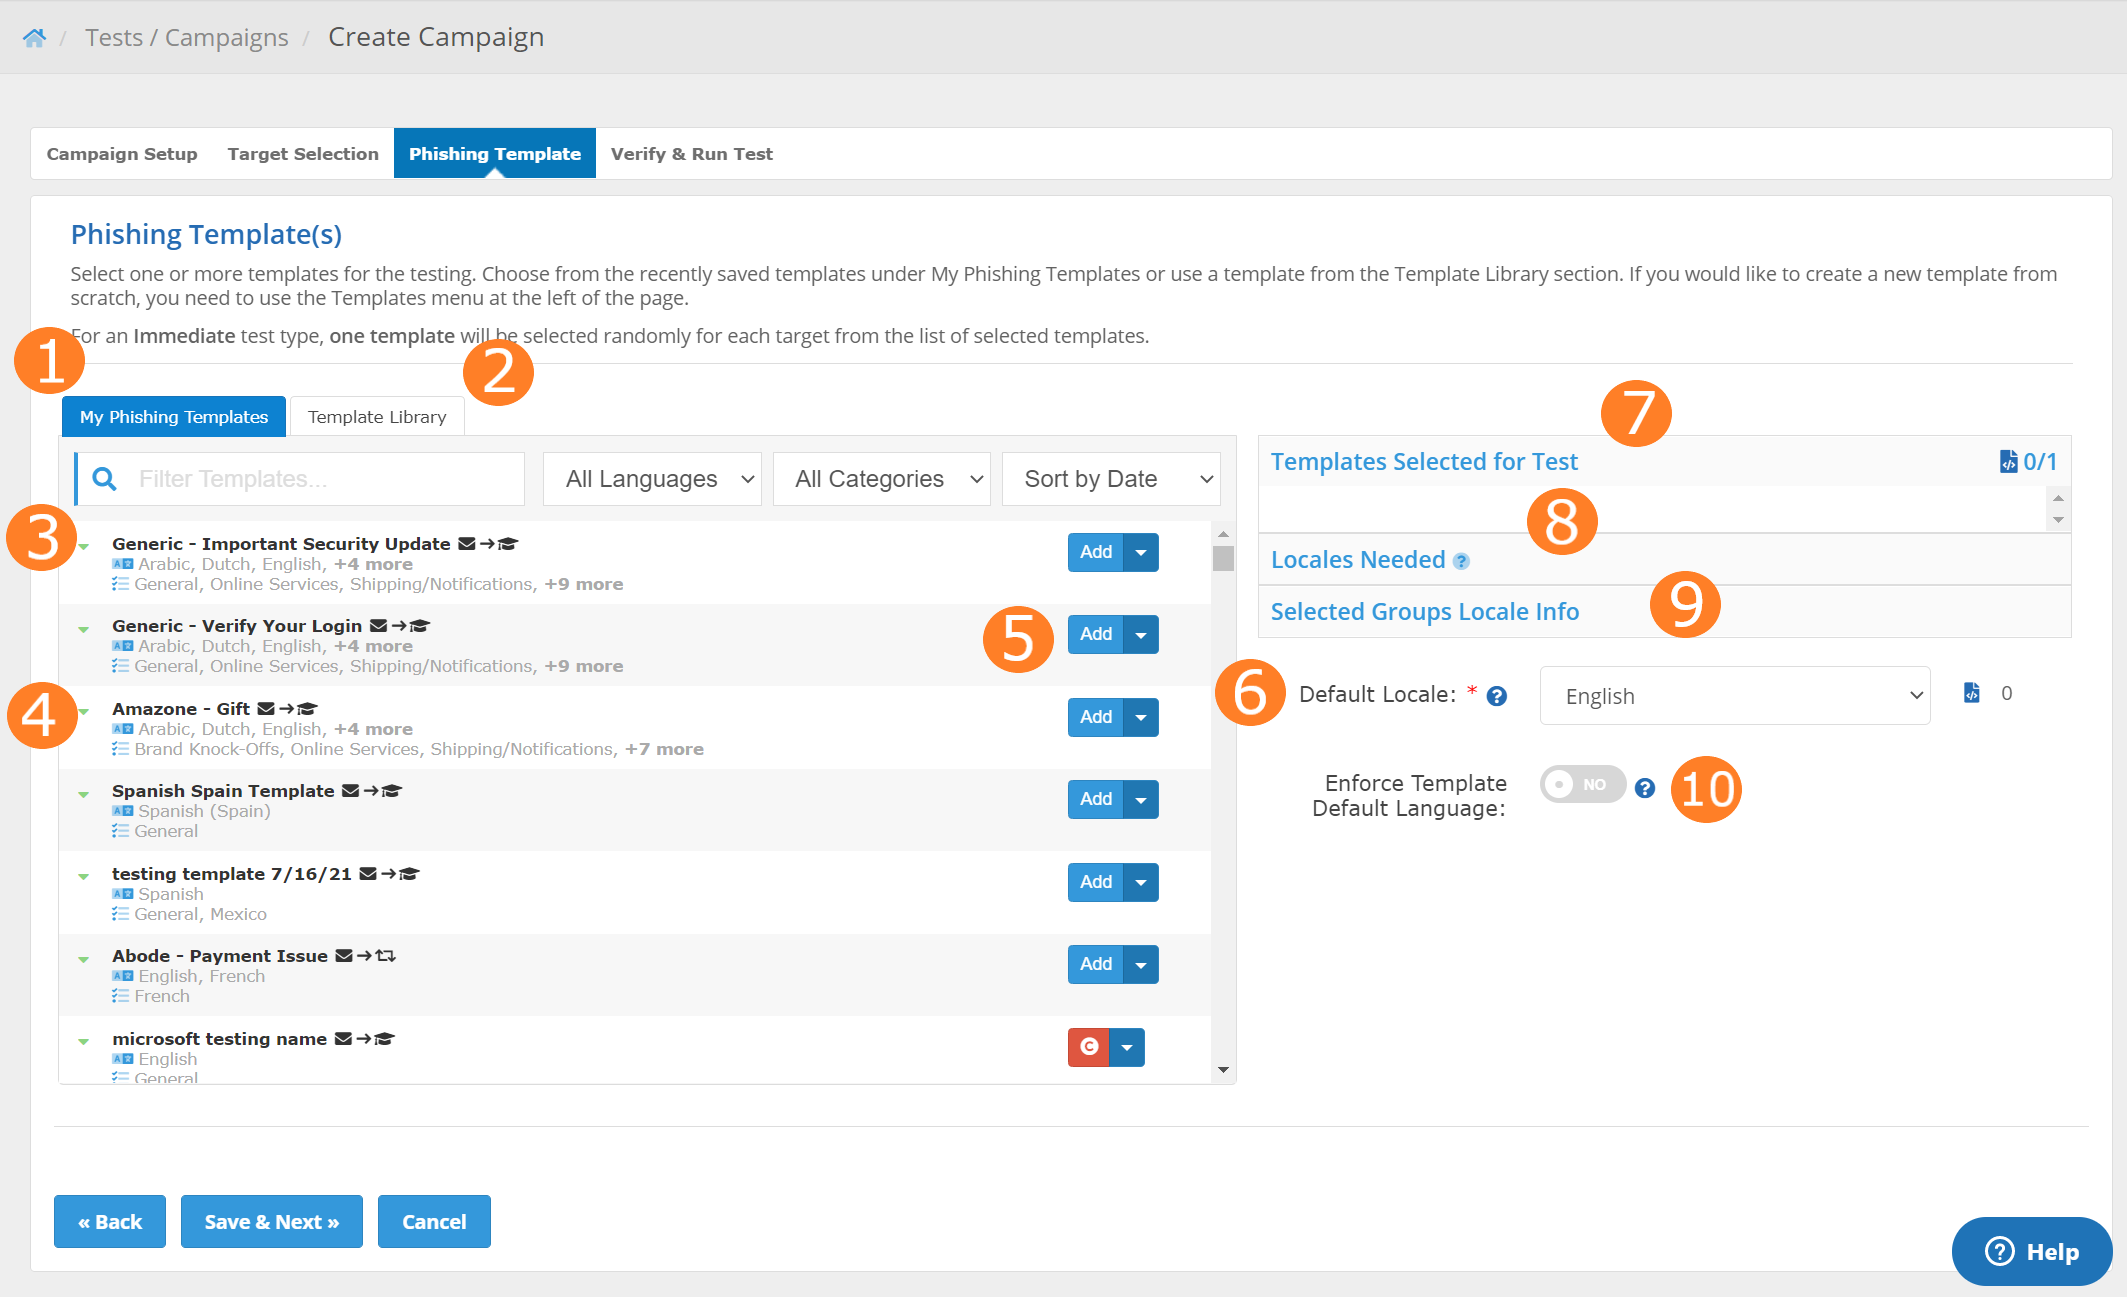
1. My Phishing/Training Templates: This tab contains all the email templates that are owned by your account, e.g. any templates that appear on the Manage Templates page.
2. Template Library: From this tab, you can select pre-made templates from the Portal Template Library.
3. Filter Templates: This allows you to filter templates by name, language, or category. There is a sort drop-down that lets you sort templates by date or name.
4. Template Window: This window contains all the templates relevant to the tab you are viewing, be it My Phishing/Training Templates or Template Library.
5. Action Buttons: Click "Add" to add the respective email template to the test. Click "Remove" to take the template off the campaign (not to be included in the campaign). If you are viewing library templates, click the "Get" button to both place the template in your account and add it to the campaign.
6. Default Locale This is the default locale on the campaign. If a group does not have a language locale set, and a target in the group does not have a language set, then scheduled email(s) to that target will be sent using the locale at the campaign level (if any of the selected templates contain this locale).
The campaign wizard will try to match the target's locale as closely as possible. If the template(s) included in the test have the locale of the target, then that version of the template will be sent. If, however, the selected templates only have a close match, then that will be chosen. For example, suppose the target's language locale is "Spanish (Mexico)", but the template's locales are "English" and "Spanish (Spain)". The target will receive the "Spanish (Spain)" version of the template.
If the target's locale does not match any of the locales on any of the selected templates, then the same logic is applied for the group locale to determine which template to send the target. The campaign wizard will try its best to pick a template that matches as closely as possible with the target's locale.
If neither the target nor the group locales match with any of the locales for the selected templates, then the campaign wizard will try to pick a template based on the default locale of the campaign.
Finally, if the language locale of the target, group, and campaign do not match any of the locales for the template, then the default locale of the template is sent to the target.
7. Templates Selected for the Test This section lists all of the templates you have added to the test. Depending on the settings you configured in the Campaign Setup stage, you may have to select multiple templates for testing. This is indicated by the ratio displayed in the header text. The test will not begin until you have added the correct number of templates.
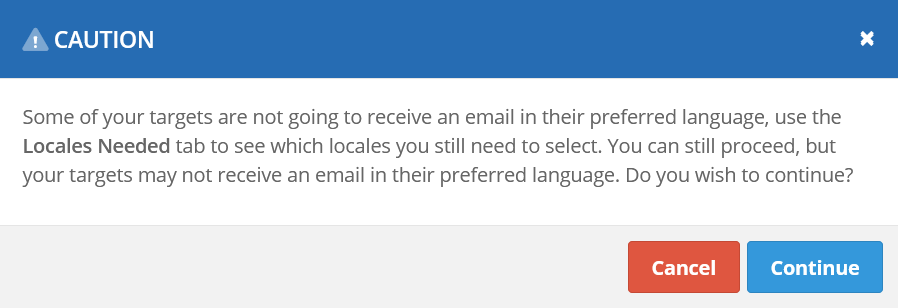
8. Locales Needed Shows the language locales that are used at the target, group, and campaign level. It is recommended, but not required, that you pick templates to satisfy all the language locales for your targets.
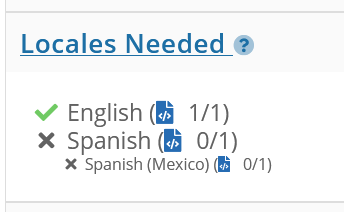
If all language needs are not met, you will be prompted with a warning. However, you can choose to continue anyway. The system will simply use the default language on the template.
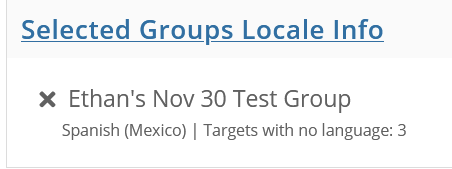
9. Selected Group Locale Info This shows the locale for the group(s) that are included in the campaign. It also gives the number of targets without a locale set.
After configuring the email templates you wish to use for the Campaign, click "Save & Next" to move to the next stage of the campaign wizard.
10. Enforce Template Default Language To only use the template Default Locale and not use Target, Group, or Campaign language to determine which locale is sent. Tip: Use this if you want to always send phishing/training in English or one language.

11. Collate Templates If your campaign is a recurring campaign or includes multiple groups, then the Collate setting will distribute the templates among the tests using the order provided in the Templates Selected panel instead of including all templates on each test. (You will want to make sure all templates used have the same localizations if using collate since the templates will be distributed using the order and may not have a target's language.)
Verify & Run Test
This is the final stage of campaign creation. In this step, you are prompted to authorize any domains that have not been authorized for testing, and you are given the option of reviewing the test configurations.
1. Admin Notifications: This lets you set up email reminders to go out daily, weekly, monthly, or quarterly to the email addresses you specify (separated by commas). Additionally, you can specify a webhook URL to receive JSON data when actions occur on the test. For more information on configuring a webhook URL, see this article.
If you have configured an SMTP connection on the Mail Settings page, then you will also be able to choose to have the emails be sent from one of your SMTP servers. See the Mail Settings article for more information.
2. Domain Authorization: Enter the name and email address of the individual(s) who will be authorizing the tests in their respective fields. Once the campaign has authorized, tests will begin as scheduled. (Note: If the domains were pre-authorized prior to setting up the campaign, then the campaign authorization emails will not need to be sent out.)
3. Group Targets: Click the ![]() to expand the Group Targets information section. This section displays the group(s) being tested and the number of targets in each group, respectively.
to expand the Group Targets information section. This section displays the group(s) being tested and the number of targets in each group, respectively.
4. Campaign Tests: Click the ![]() to expand the Campaign Tests information section. The "Tests with insufficient target counts" section will display any tests that do not have sufficient target emails to run. In order for any tests listed here to run, you will have to purchase more target emails.
to expand the Campaign Tests information section. The "Tests with insufficient target counts" section will display any tests that do not have sufficient target emails to run. In order for any tests listed here to run, you will have to purchase more target emails.
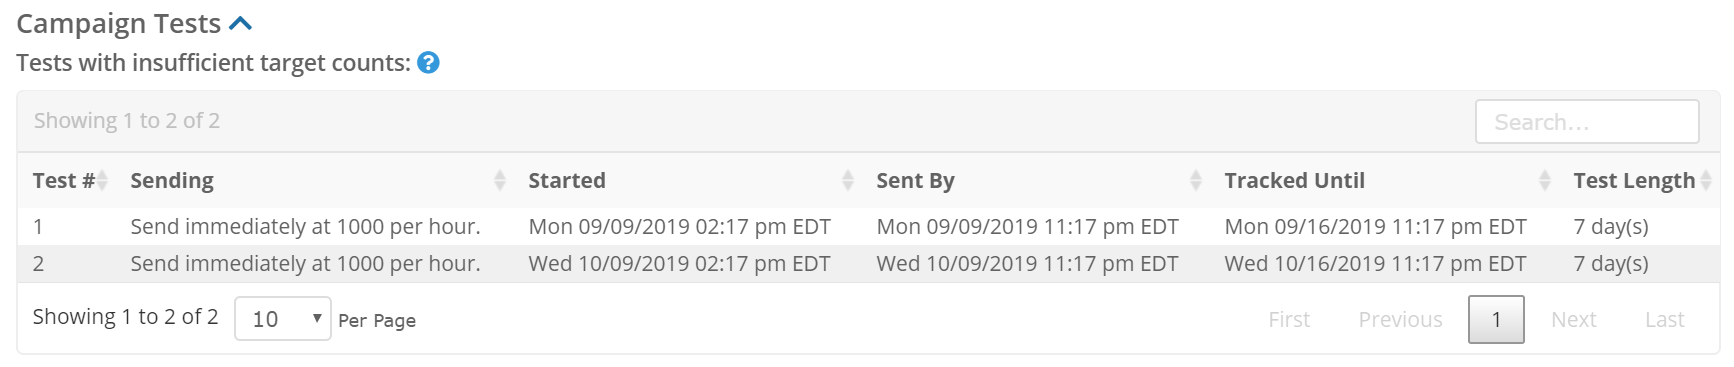
The Campaign Tests section will display every test in the campaign, the sending method, start date, end date for email send, end date for data collection, and total test length.
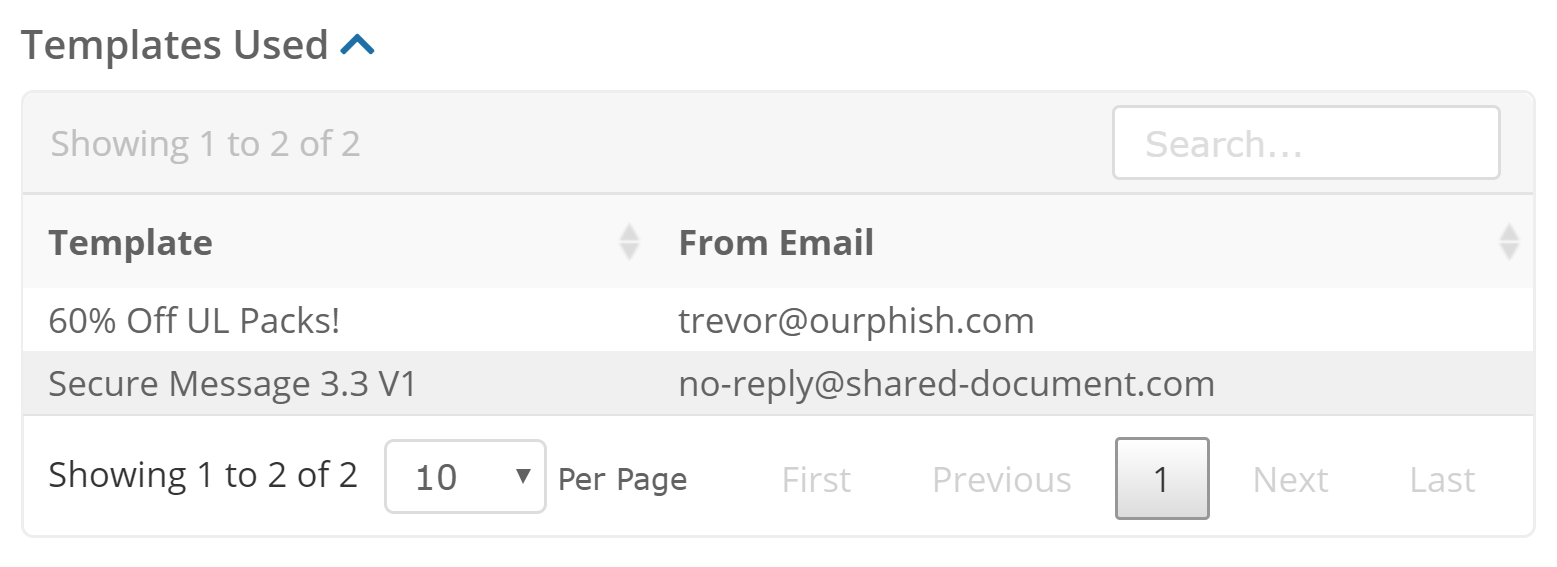
5. Templates Used: Click the ![]() to expand the Templates Used section. This will display all the phishing/training email templates being used in the tests and the from email address of the template.
to expand the Templates Used section. This will display all the phishing/training email templates being used in the tests and the from email address of the template.
After you have reviewed your tests and templates and submitted the authorization emails for the domains you are testing click the "Finish!" button to schedule the tests. The test(s) will begin on the dates scheduled when all domains have been authorized for testing.
