Overview
KillPhish can give an email a risk assessment (low, medium, or high risk). It enables reporting phishing and other types of threats. Each inbox's risk profile is unique, and KillPhish can help expose telltale signs of threats to your security.
This article describes how to install, customize, and use the KillPhish add-in for Microsoft.
- Creating and Customizing the KillPhish Widget
- Deploying KillPhish
- Opening the KillPhish Widget
- Using KillPhish
- Reported Email Customization
- Troubleshooting
- FAQs
Creating and Customizing the KillPhish Widget
To customize the settings for the KillPhish add-in, go to the Microsoft Add-In (KillPhish) tab on the Reporting Settings page. This page contains a table of KillPhish add-in instances (1), instructions for deploying KillPhish (2), and a link to deprecated KillPhish settings (3).
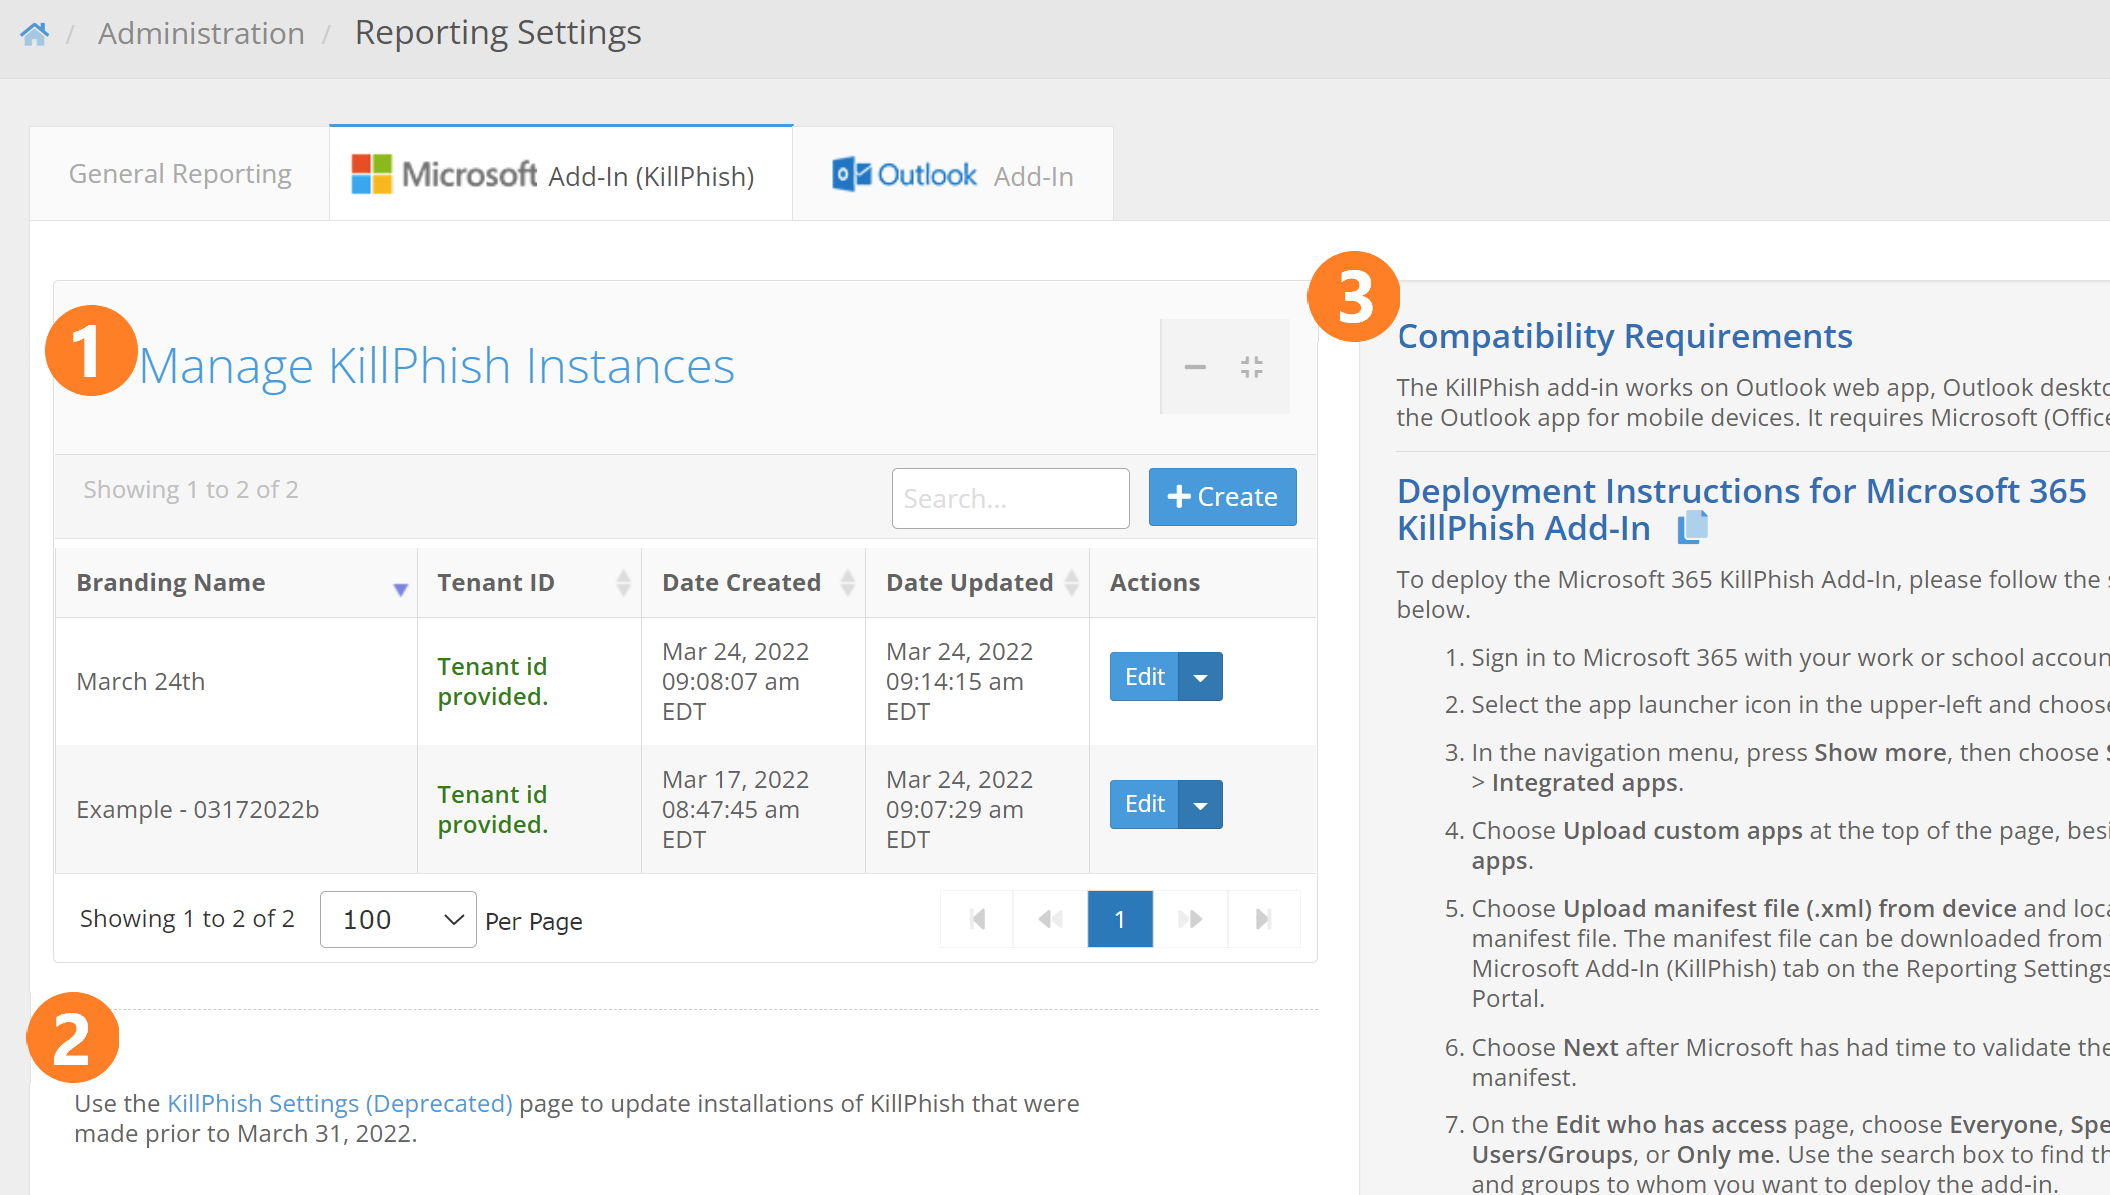
Each section is described below.
- Manage KillPhish Instances - This is a table holding the different instances of the KillPhish add-in associated with your account. A "KillPhish instance" is a manifest file that can be uploaded to a Microsoft account. Each KillPhish instance can be associated with an inbox connection from the Mail Settings page (if you have the Inbox feature), or a reporter email address. You can customize the settings for each instance of KillPhish by clicking the Edit button (described in detail below). The Branding Name column shows the name that will appear on the add-in instance when it is deployed (note: changing the branding name or branding icon will require redeploying the add-in for the change to appear on a previously deployed add-in). The Tenant ID column shows if the tenant id of the Microsoft account that the add-in is installed on has been entered for the KillPhish instance. This tenant id must be entered in order for the add-in to work on mobile devices (providing the tenant id allows the add-in to use application permissions to make API calls, which will be required when using the add-in on mobile devices). The latest build of KillPhish (released April 5, 2022) uses Microsoft Graph API to get message contents, send reported emails from the users' inboxes, and delete emails. These API calls require Mail.ReadWrite, Mail.Send, and User.Read permission at both the delegated and application level.
- Link to Deprecated KillPhish Settings - Clicking this link will take you to a page that lets you modify settings for any installations of the KillPhish add-in that were deployed prior to April 5, 2022. After April 5, 2022, you will use the settings and manifest files from the Manage KillPhish Instances table.
- Compatibility Requirements and Deployment Instructions - This box shows the compatibility requirements of the KillPhish add-in. It also gives installation instructions.
Clicking the "+Create" button will allow you to add a new KillPhish instance. Clicking the Edit button for one of the KillPhish instances will cause a pop-up to appear that will allow you to modify the settings for a KillPhish instance.
These are settings that relate to the way a reported message will appear when it is sent to the Reporter Email Address and the Additional Reporter Addresses. An example of what a reported email looks like is shown in the section in this article, Reported Email Customization. When you've entered the necessary settings and click the "Save" button, the "Consent for KillPhish to use Microsoft Graph" and manifest file links will both become clickable.
- Branding Name - The add-in name that will appear on users' inboxes.
- Inbox Connection dropdown - This dropdown will appear if your account has the Inbox feature. Associating the add-in with one of the inbox accounts will make it pull from that account's safelist and blocklist. Reported messages will be sent to the account.
- Reporter Email Address - The email address that will receive the messages when your users report them. The Additional Reporter Addresses (set on the General tab) will also receive copies of reported emails.
- Tenant ID - The tenant id of the Microsoft account that the add-in was deployed to. This can be found by logging into portal.azure.com and clicking on the Azure Active Directory button. Without the tenant id, KillPhish will work on OWA and Outlook desktop only (not on Outlook for Android or iPhone).
- Helpful Tips - This box allows you to create your own helpful tips that will appear on your user's instances of the KillPhish add-in. You are allowed to enter seven or fewer helpful tips. All helpful tips combined may not total more than 350 characters in length. Enter the helpful tips as plain text, each new tip on a new line. If you delete the helpful tips and do not enter anything in the text box, then Portal will place default helpful tips on the user's add-in.
- Reported Success Message - A message that will appear on the plugin after a user successfully reports an email. You can enter up to 200 characters of text for the reported success message. This setting is optional. If you leave it blank in your reporting settings, the users will only see the green "Reported Successfully!" popup.
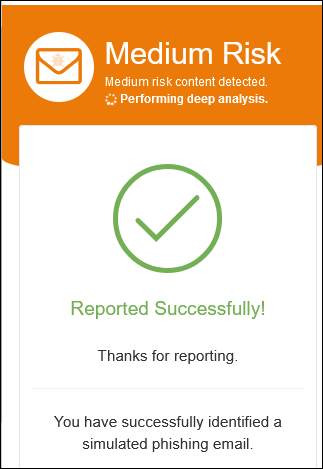
- Simulated Phishing Email Reported Congrats Message - A message that will appear below the Reported Success Message if the target reports a Portal simulated phishing email.
- Delete Reported Emails - Turning this option on will cause the email that a user reports to be removed from their inbox.
- Advanced Threat Protection - Turning this option will cause the emails to be scored. Additionally, information about the email (sender, SPF, links, attachments, words, and phrases) will be displayed, as shown below.
* Disclaimer: Users should remain vigilant against email security threats, even if the Advanced Threat Protection feature is turned on in your plugin. ATP is not capable of detecting every social engineering/phishing threat in emails. You should use the other tools that Portal provides to educate your users about the various threats posed by phishing and social engineering, and how to detect these attacks.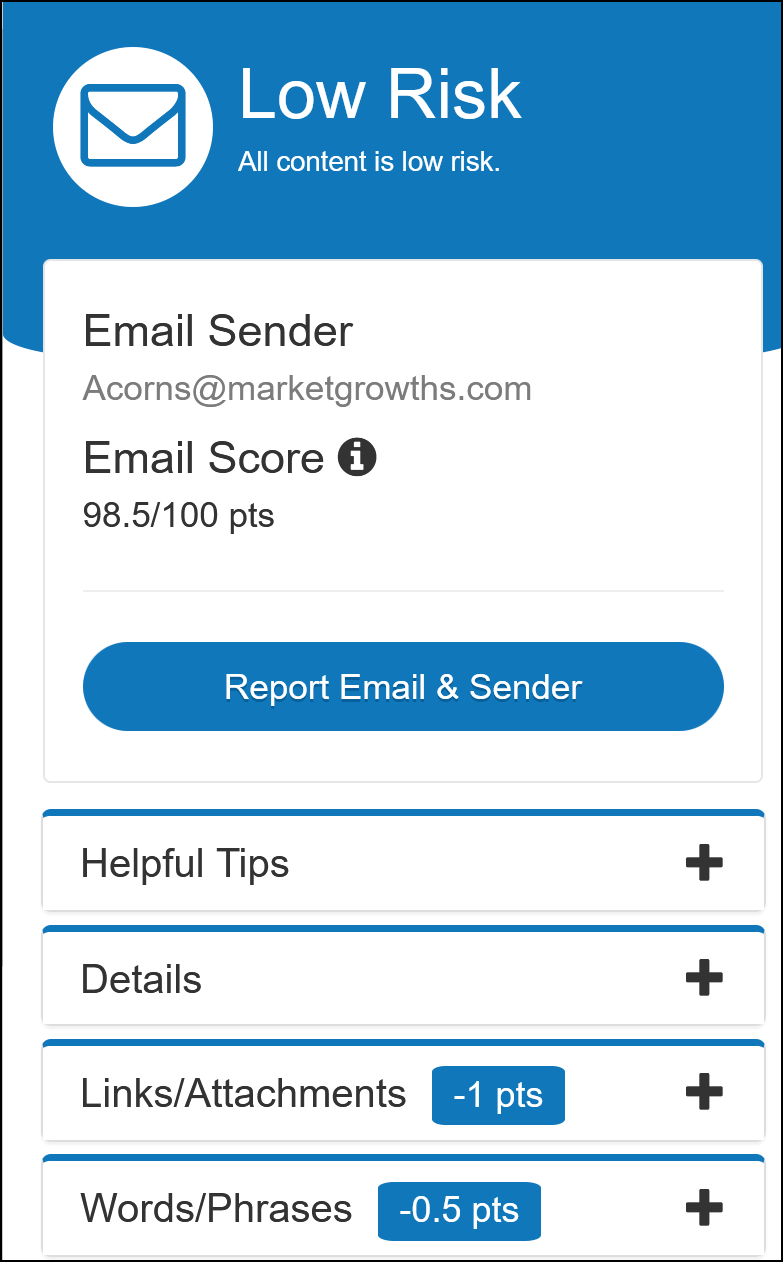
If Advanced Threat Protection is turned off, then only the helpful tips will be displayed. No score or risk assessment will be shown to the user, as shown below: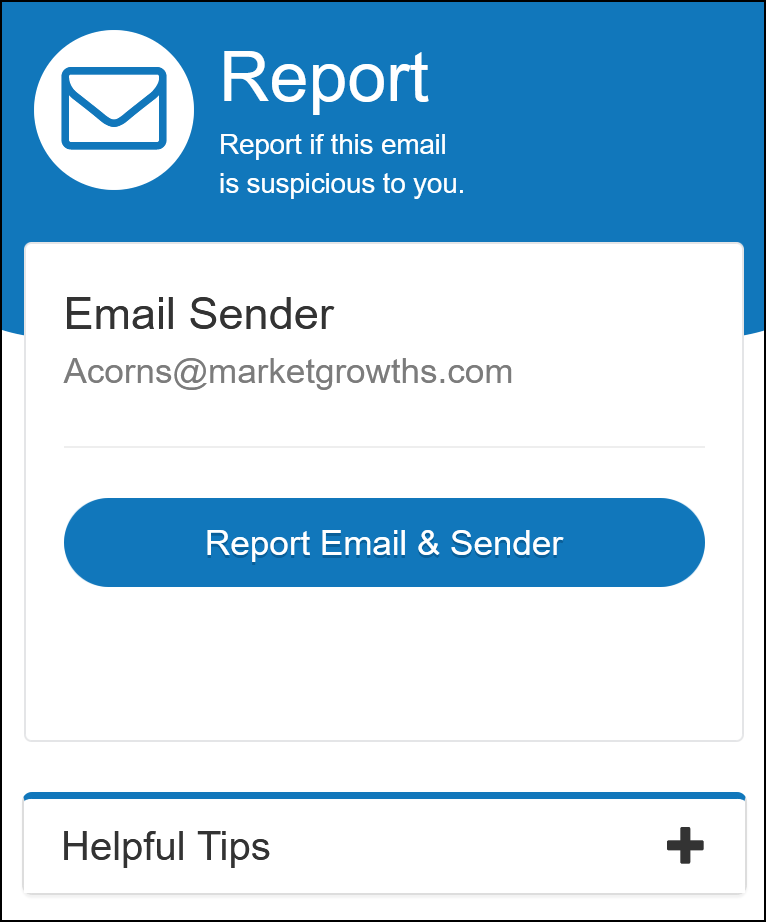
- Include The Blue Box in Reported Emails - If turned on, The Blue Box (a summary of information about the reported email) will be included in the reported message.
- Include Message Body as an Attachment in Reported Emails - If turned on, the reported message will be included as an EML attachment in the email that is sent to the Reporter Email Address. The EML attachment is a combination of the message body with the headers of the reported email. If enabled, it may take a few minutes longer for the reported email to arrive in the inboxes of the Reporter Email Address and the Additional Reporter Addresses.
- Include Message Body below The Blue Box - This option will display the original message body in the body of the reported email.
- Include Message Headers in Reported Emails - This option will create a .txt file attachment containing the original headers of the reported email.
- Number of days Portal will store large EML files and attachments - This is how long (in number of days) the large attachments will be retained on the Portal server. When users report an email that contains attachments that are larger than 3 megabytes in size, those will not be attached directly to a reported email. Instead, the attachments, as well as the EML file, will be stored on the Portal server and a link to download those attachments will be provided in the Blue Box. If you don't want these attachments to ever be removed, enter a negative number (the attachments are, by default, never removed).
- Send Simulated Phishing Emails to Reporter Addresses - This option allows you to specify what happens to simulated phishing emails that are reported by targets. If this toggle is turned on, then these emails will be sent to the Reporter Email Addresses when targets report them. If it is off, then these emails are not sent anywhere. Reported actions will still be logged on phishing tests either way.
- Branding Icon - The icon that will appear for the add-in (this is what users will click to get the plugin to scan the email and allow them to report).
- Default Plugin Color - The plugin theme that will be displayed for low risk emails. This is also the theme to be used if ATP is turned off.
- Default Plugin Color for Medium Risk Emails - The plugin theme that will be displayed for medium risk emails (not applicable if ATP is turned on).
- Default Plugin Color for High Risk Emails - The plugin theme that will be displayed for high risk emails (not applicable if ATP is turned on).
- Manifest File - This link can only be clicked if the KillPhish instance has been saved. Clicking this link will allow you to download the XML file that's used to upload on your Microsoft account.
NOTE: You will need to redeploy the manifest file in order for changes to the branding name or branding icon to appear on the KillPhish add-in. Changes to any other settings will not require redeployment of the add-in.
Deploying KillPhish
To deploy KillPhish to your organization, ensure you have downloaded the Manifest file mentioned in the previous section and login to your Microsoft 365 Admin center at https://admin.microsoft.com to follow the steps below:
NOTE: Do not deploy KillPhish from the Microsoft Add-ins page - https://admin.microsoft.com/Adminportal/Home?source=applauncher#/Settings/AddIns.
-
Sign in to Microsoft 365 with your work or school account.
-
Select the app launcher icon in the upper-left and choose Admin.
-
In the navigation menu, press Show all, then choose Settings > Integrated apps.
-
Choose Upload custom apps at the top of the page, beside Get apps.
- Under App Type, choose Office Add-in.
- Choose Upload manifest file (.xml) from device and locate the manifest file. The manifest file can be downloaded from the Microsoft Add-In (KillPhish) tab on the Reporting Settings page in Portal - click "Edit" on the KillPhish instance and scroll to the bottom of the pop-up to find the download.
-
Choose Next after Microsoft has had time to validate the manifest.
-
On the Edit who has access page, choose Everyone, Specific Users/Groups, or Only me. Use the search box to find the users and groups to whom you want to deploy the add-in.
-
When finished, choose Next. Then, click Accept permissions button. You must consent to the permissions required by KillPhish. The add-in requires permission to sign in and read user profile and read and write user mail (delegated permissions) and sign in as any user to read and write mail (application permissions). The latest build of KillPhish (released April 5, 2022) uses Microsoft Graph API to get message contents, send reported emails from the users' inboxes, and delete emails. These API calls require Mail.ReadWrite, Mail.Send, and User.Read permission at both the delegated and application level.
-
Click Next to begin deployment of the add-in. This process may take up to three minutes. Then, finish the walkthrough by pressing Next. You now see your add-in along with other apps in Microsoft 365.
-
The add-in will work on Outlook Web App (OWA) and the Outlook desktop app at this point. If you would like it to work on Outlook for iOS and Android, you'll need to enter tenant id of the Microsoft account that the add-in was deployed to. The tenant id can be found by logging into Azure and clicking on Azure Active Directory, or going to this link: https://portal.azure.com/#blade/Microsoft_AAD_IAM/ActiveDirectoryMenuBlade/Overview.
NOTE: Outlook add-ins can take up to 24 hours to appear on users' ribbons.
NOTE: Changes to the Branding Name or Branding Icon will require a redeployment of the manifest file.
Opening the KillPhish Widget
KillPhish is cross-platform compatible. Once deployed, KillPhish will be available in Outlook for desktop, mobile, and web. The method for opening the Killphish widget varies from platform to platform.
Desktop
If an email is brought into focus in the inbox, the Report Phishing button will appear in the Outlook ribbon, pictured below.

Click the button to display the KillPhish widget.
Web
To display the KillPhish widget in the Outlook web app, bring an email into focus, then click the 'More Options' ellipsis located at the top-right corner of the email window.
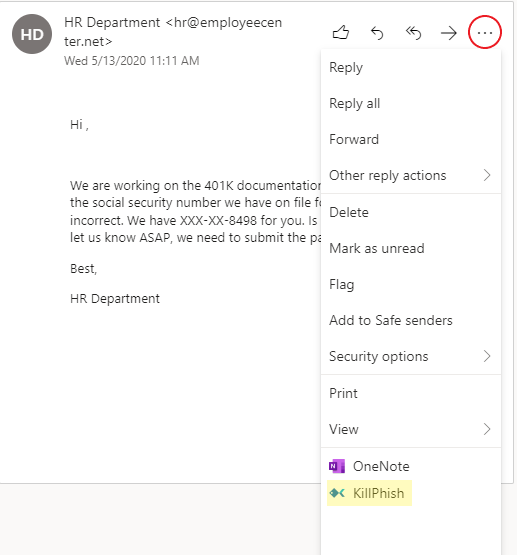
Once the options menu is displayed, click 'KillPhish' to display the KillPhish widget.
Mobile
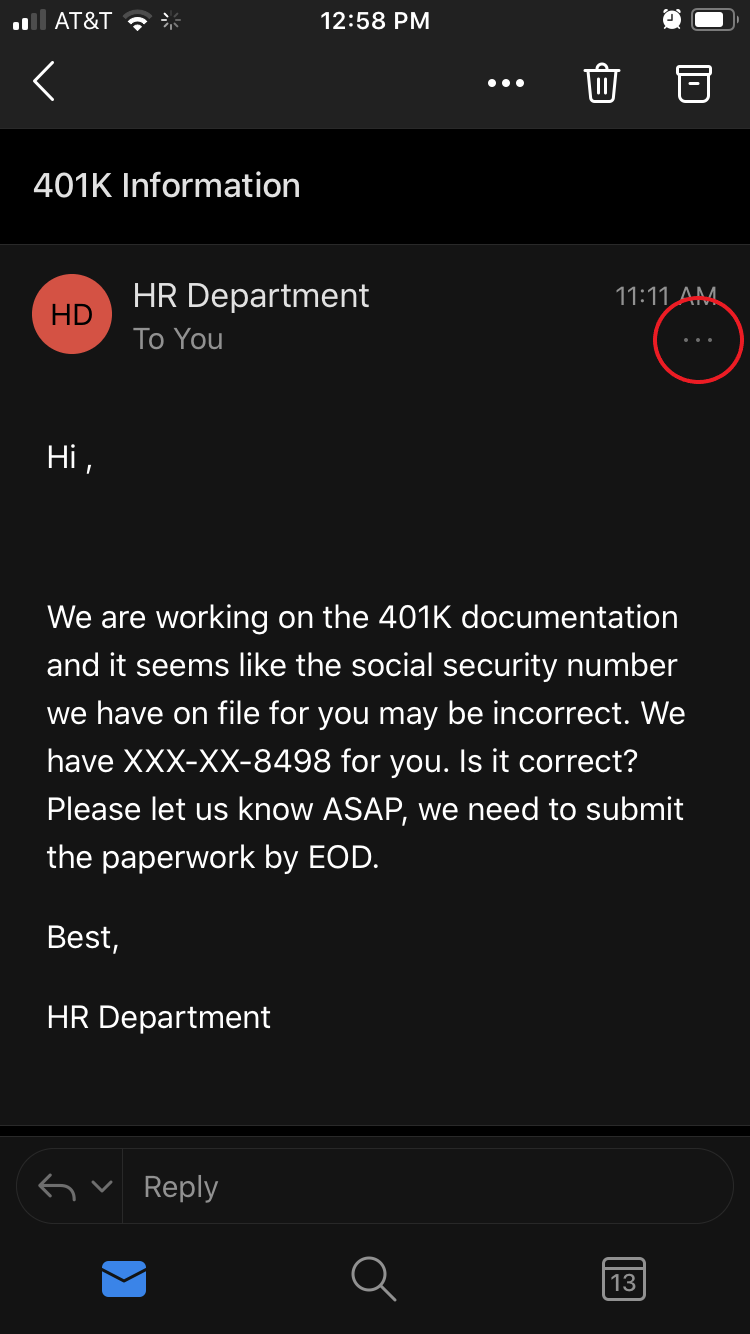
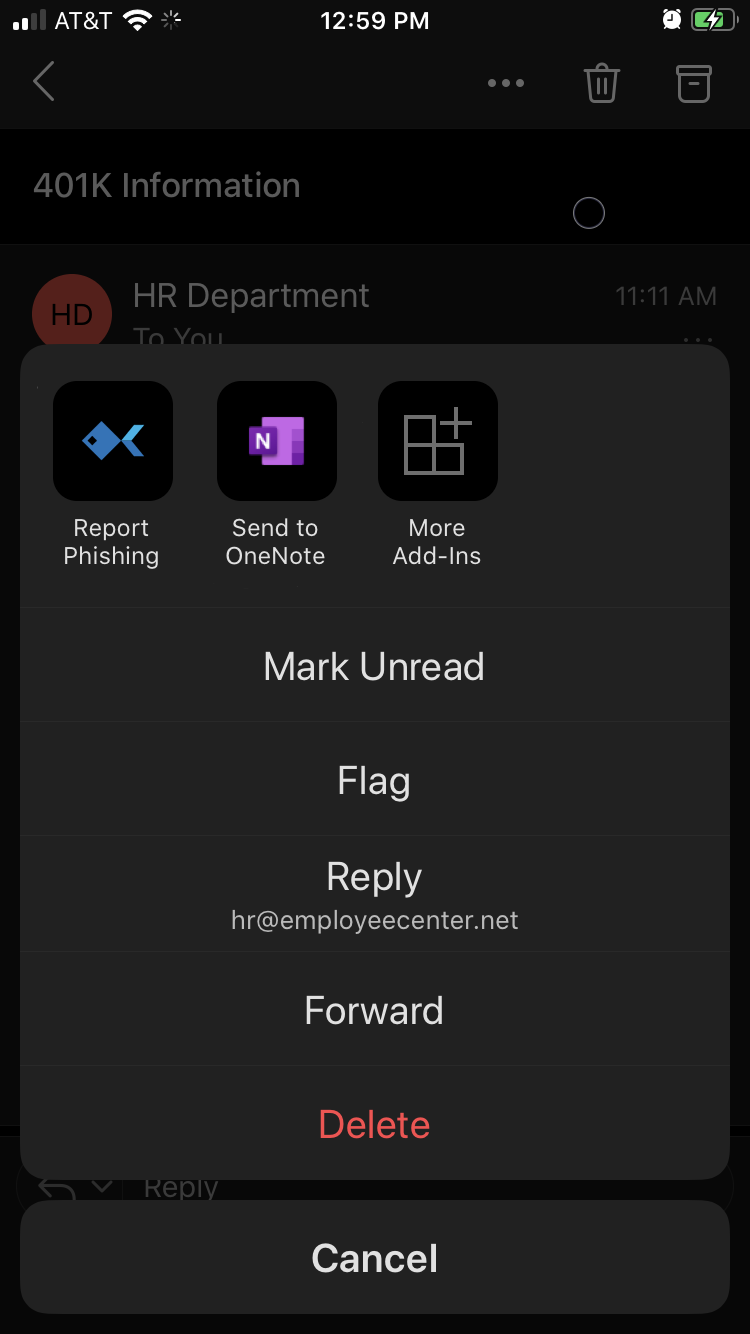
The KillPhish widget is only available for mobile devices from within the Outlook app. To access the options menu, select an email then tap the options ellipses in the top-right corner of the email window.
Once the options menu is displayed, tap the KillPhish icon to open the widget.
If you have set a Reported Success Message in the KillPhish settings, then this message will appear below the green checkmark after the user has reported the message.
Using KillPhish
KillPhish will provide helpful tips related to dealing with suspicious emails and provide a risk assessment of potentially harmful emails. Using KillPhish, users can report suspicious emails to the email account of your choice at the click of a button.
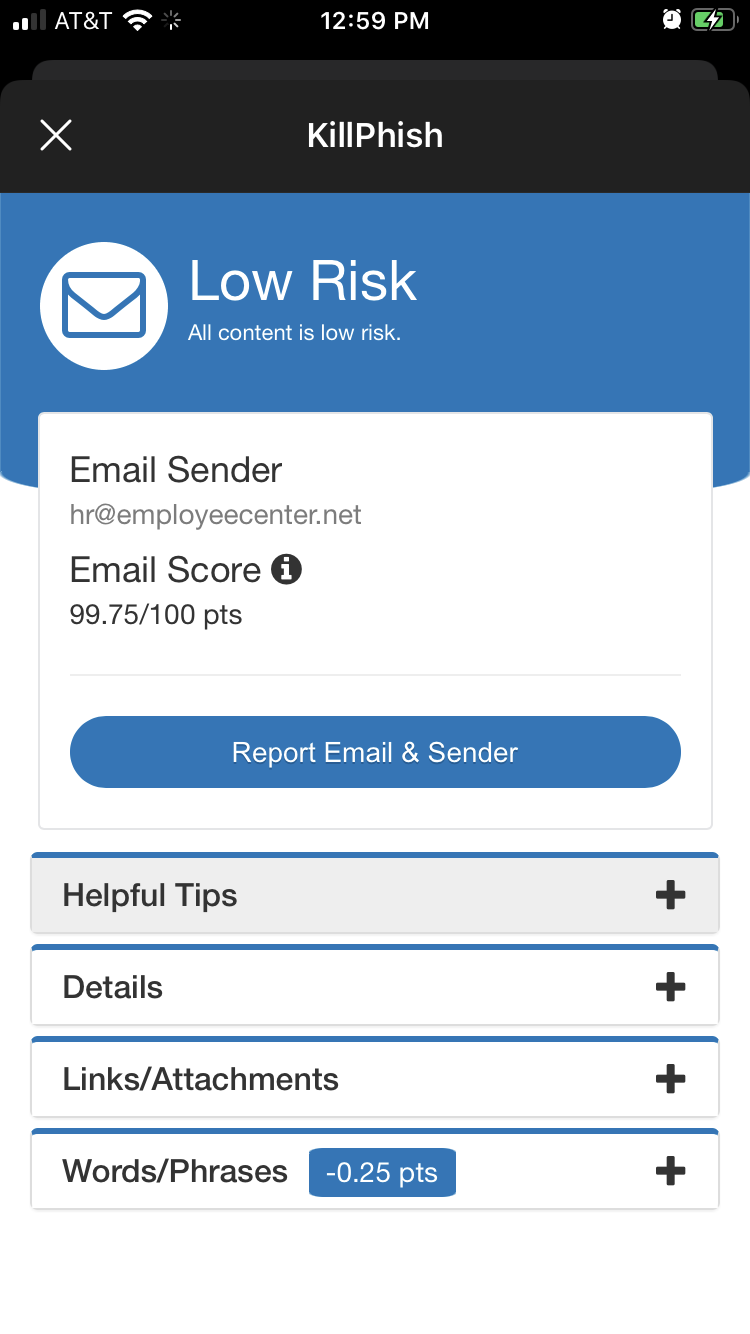
Deploying KillPhish will enable the KillPhish widget across all Office platforms. The KillPhish widget is pictured below.

- Risk Level This is the risk level the email was classified as by the plugin. There are three risk levels: low risk (for scores >= 95), medium risk (for emails scored between 60 and 95), and high risk (for emails scored below 60). Several different factors influence an email's score: the headers (DKIM, DMARC, and SPF), if certain attachments are included in the email (HTML and EXE attachments, for example, decrease an email's score), and if certain words/phrases appear in the email. Also, any links in the email will be checked by Google Webrisk and if they are dangerous, the email will be marked as high risk.
- Helpful Tips contains suggestions for dealing with potential harmful emails, including reviewing links before clicking, verifying file types of attachments, and considering the ramifications of following any instructions or actions requested in the email.
- Details lists important properties of the email and their values, including the sender, subject, SPF record pass/fail (if SPF checks fail, the email will be labeled as high risk), attachments, and links contained in the email. Only shown if Advanced Threat Protection is on for the KillPhish plugin.
- Links/Attachments lists all links and attachments in the email, and their associated URLs and file types. Only shown if Advanced Threat Protection is on for the KillPhish plugin.
- Words/Phrases assesses certain keywords and phrases typically associated with risky emails, including but not limited to, 'password', 'irs', 'label', and 'invoice'. Only shown if Advanced Threat Protection is on for the KillPhish plugin.
After users have reported emails, the email may be removed from their inbox if you have turned on the Delete Emails Reported setting on the Microsoft tab on the Reporting Settings page.
* Disclaimer: Users should remain vigilant against email security threats, even if the Advanced Threat Protection feature is turned on in your plugin. ATP is not capable of detecting every social engineering/phishing threat in emails. You should use the other tools that Portal provides to educate your users about the various threats posed by phishing and social engineering, and how to detect these attacks.
Reported Email Customization
When your users report an email, the reported message will go to the Reporter Email Address (set on the Reporting Settings page in Portal) and the Additional Reporter Email Addresses (set on the Reporting Settings page in Portal).
The email that is sent to the Reporter Email Address and Additional Reporter Addresses will look something like the below message.
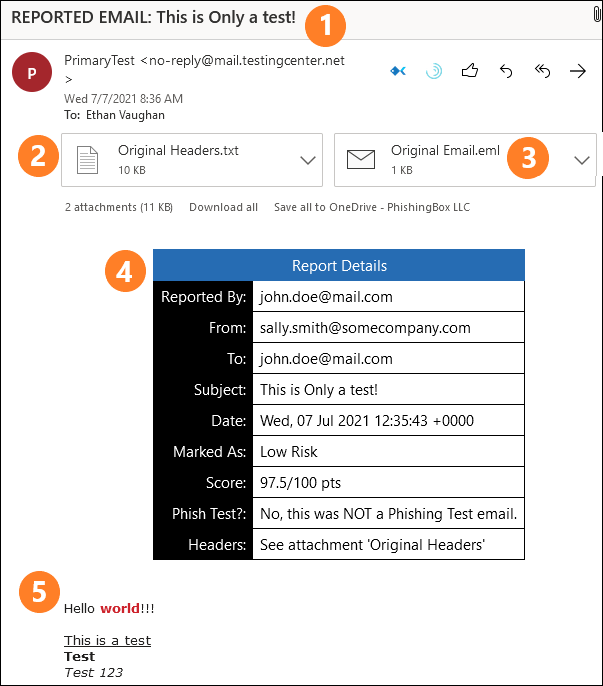
- Subject - The subject of the reported message will contain the words "REPORTED EMAIL:" in addition to the subject of the original email.
- Original Headers attachment - This text file attachment contains the original headers of the reported message. KillPhish cannot collect the headers on all devices. For example, the headers cannot be collected on Outlook for Android or iOS. Outlook 2016 for Mac and Windows also cannot collect the message headers. The Outlook version needs to support the API requirement set 1.8 or higher. A complete list of API requirement sets and the corresponding Outlook versions that support them can be found in this article. You can choose to not include this attachment by turning off the "Include Message Body below The Blue Box" setting on the Reporting Settings page.
- Original Email attachment - This is an EML file of the original email message. You can choose to not include this attachment by turning off the "Include Message Body as an Attachment in Reported Emails" option on the Reporting Settings page.
- "The Blue Box" - This is a summary of information about the reported email. It shows who reported the message, the sending email address, CC'd emails, who the email was sent to, the message subject, date sent, the category (low, medium, or high risk), the message score, if it was a phishing simulation email, and if KillPhish could collect the message headers. You can choose to not include this attachment by turning off the "Include The Blue Box in Reported Emails" option on the Reporting Settings page.
- Original Message body - Below The Blue Box will be the original message body. If you do not wish to include the original message body in reported emails, you can turn off the "Include Message Body below The Blue Box" setting on the Reporting Settings page.
Troubleshooting
Allow up to 72 hours for the plugin to become fully functional and ready for use by your users.
If you run into the following error with the KillPhish plugin,

then the plugin may be getting blocked by a firewall or security software.
The KillPhish add-in is supported on the most recent build/version of Outlook. While KillPhish may function on older versions, continued functionality is not guaranteed. It is recommended that updates be made to the most recent build/version for all devices.
NOTE: Outlook add-ins can take up to 72 hours to appear on users' ribbons.
FAQs
Will KillPhish work on shared mailboxes?
No, the KillPhish widget will not work on shared mailboxes.
Why does KillPhish need ReadWrite application permissions? (These permissions give the add-in the ability to read and modify mail from any user in the tenant.)
Due to the way Graph API works when called from a mobile device, application permissions are required in order for KillPhish to make API calls when used on a mobile device. The add-in will only ever use these permissions when a user opens the add-in (it will use the read permission then) and reports an email (uses both the read and write permissions when reporting an email).
Do the application permissions give KillPhish the ability to modify mail in all mailboxes?
As indicated by the permissions popup, the permissions granted to KillPhish do allow the add-in to modify mail in any mailbox in the tenant. Note, though, that the only time KillPhish deletes or creates emails is when a user reports a message.
Does KillPhish work with GCC High accounts?
No, KillPhish does not work with GCC High Licensed accounts.
What information related to the reported emails does KillPhish store?
The only information that the plugin stores for reported emails is the message id and the email address of the individual reporting this email. This information is used to display an alert on the plugin stating that it was previously reported, should the user open the reported email a second time.