Sections
- Template Editor Top Bar
- Template Editor
- Phishing Email Details & Settings
- Settings Drop-Downs
Template Editor Top Bar
 This button allows you to send a copy of the phishing email to your inbox. Clicking this button will show a popup. Enter the email address that you want to send the email to. You can also replicate a specific target by turning on the Replicate a specific target toggle (what this feature does is any variable in the phishing email template, such as {fname}, {email}, {company}, etc. will be replaced by the data for that target).
 You will need to click the Save button in order to retain any changes you have made while editing, this includes any information entered on a pop-up window.
If the phishing email template leads to a landing page, then the landing page tab will be visible. You can click on this tab to view the landing page.
If the phishing email template leads to a training page, or if it leads to a landing page that then leads to a training page, then the training page tab will be visible. You can click on this tab to view the training page.
If there are emails scheduled to be sent out using the phishing email template, the tab at the top will appear with a spinning icon, like this:
Template Editor
You can edit the body of the template, adding images, icons, tables, text, etc. to the template, using the WYSIWYG editor.
Any links you want to redirect to the template’s landing/training page (and be tracked) should use {hook_url} as the URL. The system will replace this tag automatically with the appropriate link. For example, if you have an a tag in the template that looks like this,
In the email that a target receives, the HTML for the link would appear similar to this:
When editing the template, the Variables dropdown allows you to select items that will be replaced in the actual test email. These include, but are not limited to, such items as the target’s name, or optional group and target fields. See the appendix for a listing of available variables. The “{hook_url}” can be used in place of the “{hook_link}”. (The {hook_url} is the entire URL in the email, whereas the {hook_link} is an a tag that contains a link pointing to the landing/training page.) This is also used if you want a clickable image. Images may also be clickable for tracking purposes, simply place {hook_url} in the Image URL field.
To upload an image to the phishing email template, click on the Image button, pointed out below. You'll need to pick an image off your computer, upload it to the server, then select it.
The Code tab on the template editor allows you to edit the HTML of the template.
Phishing Email Details & Settings
The Template Settings sidebar contains dropdown menus that allow you to configure more specific template options and settings.
If there is an error with your template, it will be displayed above the Template Settings section.
- Template Settings - Displays general information about the phishing email template.
- Template Name - Name of the template to be displayed throughout the portal.
- Template Description - A Brief description of the template to be displayed throughout the portal.
- Template Categories - Categories assigned to the template (primarily used for to help you filter and group certain templates when searching).
- Email Settings - Displays settings specific to the currently displayed template localization.
- From Name - Name to be used in the email's from address.
- From Email - Email to be used in the email's from address (Cannot include special characters).
- Reply-To Email - Email to be used in the email's reply-to address
- Email Subject - Subject line of the email.
- Default Locale - Toggle to make the currently viewed localization the default for the template. The default localization will be used as the localization for any Targets that do not have a language set.
- Completion Settings - Set up the next step in the phishing progression upon target failure.
- Completion Options - Select a redirect option that triggers if a target clicks on a link in the email.
- No Redirect (Reply-To only) - Targets will not be redirected to a landing page, training page, or custom URL.
- Landing Page Template - Select a landing page to redirect the target to, either a custom page or a system library page. There is also an option to copy the current landing page (if one is already selected) or create a new page from scratch.
- URL Redirect - Redirect the user to any URL you choose.
- Training Page - Select a training page to redirect the target to, either a custom page or a system library page. There is also an option to copy the current training page (if one is already selected) or create a new page from scratch.
The appropriate secondary fields you will need to fill out will appear based upon your selection in landing Page Options, either a drop-down to select the landing/training page you want or a text input field to enter a URL.
- Domain Name - This allows you to specify what the domain of the landing/training page is. It is recommended to use the same domain as the From and Reply-To domain on the template. When you change the domain name for the template, it will automatically change it for all localizations.
- Completion Options - Select a redirect option that triggers if a target clicks on a link in the email.
-
Custom Mail Servers - This setting has been migrated to the Mail Settings page.
- NOTE: Custom inboxes are not required to log reply-to actions.
- Tracking Settings - Adjust how failures will be tracked for the template.
- Track Attachment Open - Add an attachment to your email that can be tracked in the system. In order to use this option, you must use the predesigned file from the system (Word .doc or Excel .xlsm). You can download this file directly from the template editor. This file contains a special tracking key that the system is listening for. In order for the download tracking to work, targets must have protected mode turned off and macros enabled on their Word or Excel app. You are free to add your own content to this file, however, do not modify the TrackingKey.
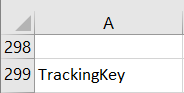 The TrackingKey must be in sheet 1 in cell A299. Save as .xlsm. Once you have finished editing your files you can upload them using the Add Attachment button.
- NOTE: If you would like to use images in the .xlsm file, they must be bound to cells in order to preserve the formatting of the document for parsing. See the following article for more information: https://trumpexcel.com/insert-picture-into-excel-cell/
- Track Custom Domain Replies - This setting is deprecated. Replies to phishing emails will always be logged. However, if the reply goes to an email address with a domain that is not a Portal domain, then the reply action will be logged only if there is a reply inbox connection configured for the email address (see the Mail Settings page for instructions on configuring a reply inbox).
- Track Attachment Open - Add an attachment to your email that can be tracked in the system. In order to use this option, you must use the predesigned file from the system (Word .doc or Excel .xlsm). You can download this file directly from the template editor. This file contains a special tracking key that the system is listening for. In order for the download tracking to work, targets must have protected mode turned off and macros enabled on their Word or Excel app. You are free to add your own content to this file, however, do not modify the TrackingKey.
- Miscellaneous
- Hook URL Link Text - This is the text that appears whenever the {hook_link} variable is used. By entering text in this field you can customize how the anchor tag will read. Additionally, you can choose to check the Not Needed checkbox to display the link URL in the text instead.
NOTE: The {hook_url}/{hook_link} variables are how the system tracks a “Click” and the way you get your targets to the next step in the phishing progression (either to a landing or training page or a URL redirect). Unless you only want to track email opens and replies, your email MUST contain one of these customization tags in the email body. The {hook_url} contains the entire URL to the landing or training page, whereas the {hook_link} is clickable text that leads to the landing or training page. - Custom Header Name & Value - Add your own custom headers information to the email. You can then create safelisting rules in your mail client based on the custom headers.
- Body Background Color - Change the background color of the email.
- Hook URL Link Text - This is the text that appears whenever the {hook_link} variable is used. By entering text in this field you can customize how the anchor tag will read. Additionally, you can choose to check the Not Needed checkbox to display the link URL in the text instead.
Add Locale, Preview, and Fullscreen Editor Buttons
The buttons at the bottom of the template editor allow you to restore the template to the way it was when you originally loaded the page, open the WYSIWYG and/or HTML editor, as well as change the layout.
- Current Locale drop-down - The drop-down in the bottom-left corner of the template editor lets you display a different locale for the template. You can add a new locale by clicking the plus icon. A popup will appear asking you to choose an existing locale to copy and the new locale you want to add. Once the locale has been created you will need to edit it to add your translation.

- Restore - Remove any changes made since the last save.
- Fullscreen Editor lets you edit the phishing email in the WYSIWYG editor.