Complete the instructions in this article previous to utilizing this page:
How to Integrate with Litmos
Running your Initial Sync
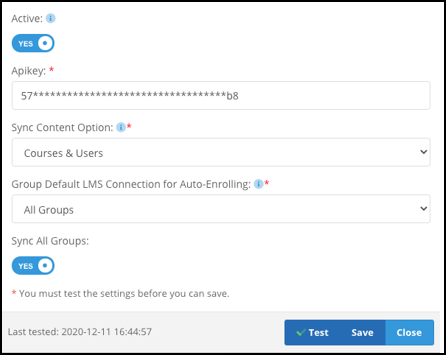
After you have configured your Litmos integration and selected your settings, you will need to press Test and Save to run your initial sync. Afterwards, if the integration is set to Active, it will automatically sync daily by default.
Press the Test button to verify your connection and if successful, then press Save to run your initial sync. Note: please ensure the integration it set to active and the Litmos account you are syncing to has at least one team/group created.
Depending on the number of Users you are syncing, this process can take seconds to minutes to complete.
Manually Syncing Users
If you need to manually sync users outside of the normal daily sync, you can do this in two methods.
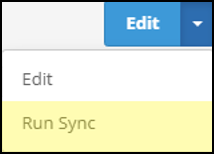
- Account Sync can be completed in the Integration store by navigating to the Litmos card, clicking the drop-down arrow and selecting Run Sync. This will sync per the settings configured.
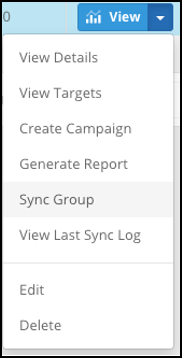
- Individual Groups can also be synced from the Manage Groups page manually. Navigate to this page and click the drop-down arrow to select Sync Group.
Verifying Courses that have been Synced from Litmos
After you have successfully synced your Courses, you will see a sub-menu labeled Training. Navigate to this Training menu to find Integration Courses.

Here you will find any Course that has been synced from your Litmos account. These Courses will later be used in your Campaign Creation to enroll Users by actions performed on those campaigns. Note: if you do not see the “Integration Enrollments” sub-menu, that is because you have yet to configure a phishing campaign that has enrolled users in Litmos training. This will appear as soon as you have data to be shown.
Creating a Campaign with Litmos Enrollment
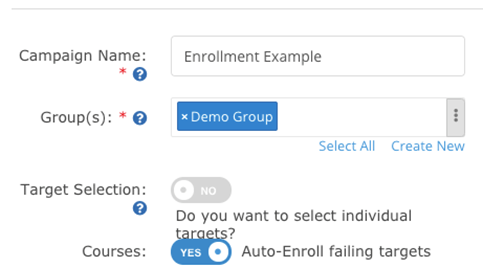
Now that you have verified the Course you want to enroll users in to has been synced, you will next look to create a campaign. Navigate to Create Campaign to find a toggle of Auto-Enroll Failing Targets. If you want to assign Litmos training based on results from your phishing campaign, toggle this slider to Yes.
The next step in campaign creation is where you will define how you want users to be assigned training. You can assign training based on actions within that campaign. You can also assign different training per group if you include multiple groups within your campaign or “lock” training to be set to Litmos synced groups within that campaign.
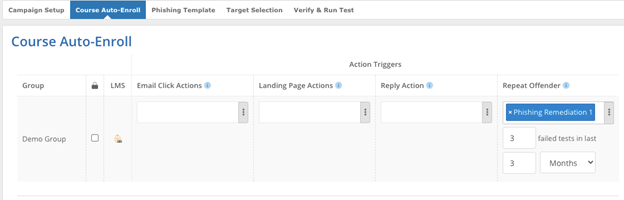
- Group: The group(s) name selected within your campaign
- Lock Icon: Select this to assign the same training on selected Litmos group to other Litmos groups
- Email Click Actions: A unique click event will assign selected training.
- Landing Page Actions: If using a Data-Entry type campaign, a unique landing page action (e.g. entering information in a form) will assign selected training
- Reply Action: If a user replies back to a campaign email, this will assign selected training. Note: this does not include Auto-Reply messages
- Repeat Offender: Use the options to set a threshold of failures to identify users for training.
Verifying Enrollment
After a campaign has been sent with Auto-Enroll Failing Targets enabled, you can look at any user who qualifies for training and is sent over to Litmos to be assigned. Note: Users will be matched by email address so any user who doesn’t match an existing user in your Litmos roster, this user will error for training as they do not exist.
Navigate to Training > Integration Enrollments to view a real-time log of training assignment sent to Litmos.
