SAML SSO Setup
You can set up SSO on the SSO Settings page for both the Portal and the School, but you will need to create two separate applications on your IDP (this is due to needing to use different URLs). The top section are Portal settings that you will paste into your IDP and the bottom section are settings that you will get from your IDP.
NOTE: If a user is provided access to the phishing portal via your organization's SSO IDP and does not already have an account in the phishing portal (in Administration>Manage Portal Users), an account will automatically be created with a role of "Admin" when the user accesses the phishing portal via SSO.
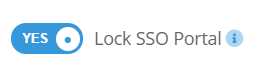
SSO Lock
If enabled, administrators can log in to the portal via SSO only. If the SSO configuration fails and administrators can no longer log in, you will have to contact support in order to disable this feature.
From inside Portal, go to Administration > Settings > SSO Settings and choose OneLogin from the Service drop-down.

From the OneLogin Admin portal, go to the Applications tab and click the "Add App" button in the top right corner.
In the search bar, type "SAML Test Connector" and select the "SAML Test Connector (Advanced)" option.
Step 1: Initial Setup
Give your new application a name, upload an icon of your choice, and enter a description that your users will use. Then click "Save" in the upper right corner. The page will reload and place you on the "Info" tab of the configuration.
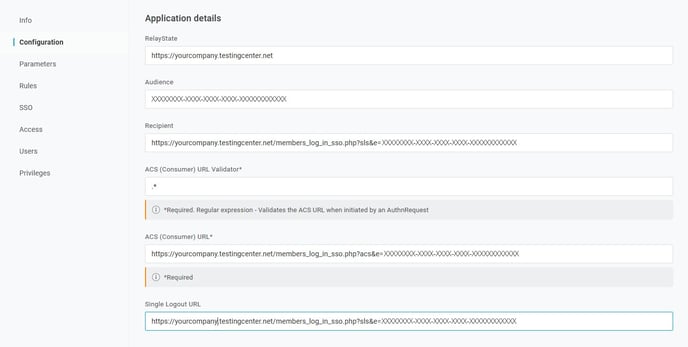
Step 2: Configuration Tab
Portal SP Settings you plugin into your IDP:
- Your Whitelabeled URL -> RelayState (Note: Be sure to add "/index.php" to the end of your whitelabled URL. For example, if your whitelabled URL is "https://yourcompanyschool.testingcenter.net", you'd want to use https://yourcompanyschool.testingcenter.net/index.php as the RelayState.)
- EntityId -> Audience
- ACS (Consumer) URL -> Recipient
- Enter the text ".*" -> ACS (Consumer) URL Validator
- ACS (Consumer) URL -> ACS (Consumer) URL
- Single Logout URL -> Single Logout URL
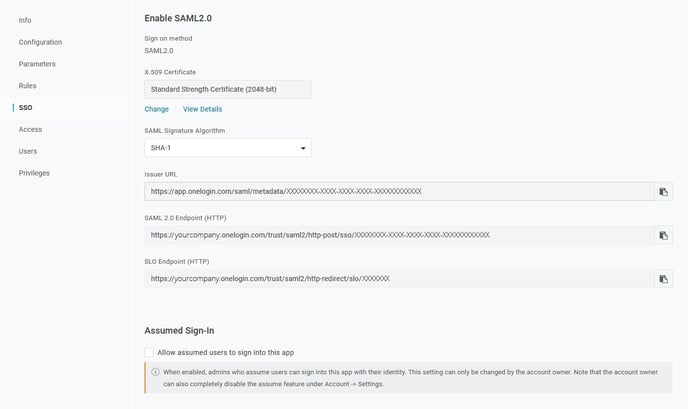
Step 3: SSO Tab
Your IDP settings you plugin into Portal SP:
You can view the x.509 Certificate by clicking the "View Details."
- x.509 Certificate -> x.509 Certificate
- Select SHA-1 for the SAML Signature Algorithm
- Issuer URL -> Issuer URL
- SAML 2.0 Endpoint (HTTP) -> ACS Endpoint URL
- SLO Endpoint (HTTP) -> SLO Endpoint URL
To navigate to the Portal SSO Settings for OneLogin, go to Administration > Integration Store and click on the Setup button for OneLogin.
Step 4: Save
Click "Save" in the upper right corner.
Note: A sign in URL can be obtained from the users IDP, usually it will be a URL with query parameters.