Follow the steps below to deploy the single sign on application to users in your Azure Active Directory.
If you would like to configure SSO for both the phishing and training portals, you will have to configure two apps in Azure and complete this process separately for both apps.
Warning: If a user is provided access to the phishing portal via your organization's SSO IDP and does not already have an account in the phishing portal (in Administration>Manage Portal Users), an account will automatically be created with a role of "Admin" when the user accesses the phishing portal via SSO.
Registering the application
Registering the application will require an Azure administrator with a minimum role of 'Application administrator'.
To register the app, navigate to portal.azure.com.
Click the 'Azure Active Directory' link located in the Azure Services section of the portal's home page.

In the Azure Active Directory portal click the 'Enterprise Applications' link in the site navigation bar.
![]()
Click the 'New application' button located at the top of the Enterprise applications list.
![]()
Click the 'Create your own application' button located at the top of the app gallery.
![]()
In the 'Create your own application' modal form that appears, give the app a name and select 'Integrate any other application you don't find in the gallery'. Then click the 'Create' button.
Azure will redirect you to the app overview. Click the 'Set up single sign on' card.
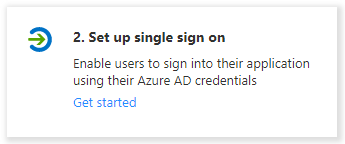
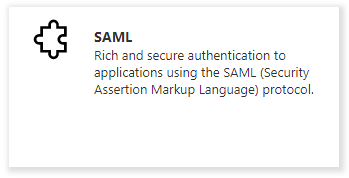
Then, on the 'Select a single sign-on method' page, click the SAML card.
This will open the SAML-based Sign-on page. Next, log in to the Hook Security, Inc portal in a new tab. You can now configure the SSO and SLO (optional) URLs in Azure.
Azure SSO configuration
In the Hook Security, Inc portal tab, navigate to Administration > Settings > Account Settings for portal SSO or Administration > Settings > School Settings for school SSO.
NOTE: If you would like to configure SSO for both the training and phishing portals, you will have to configure two apps in Azure and complete this process separately for both apps.
Under the SSO tab, you'll find find the Service Provider Settings.
Now you are ready to map the Service Provider (SP) URLs to Azure. In the Azure portal, click the ![]() button located on the 'Basic SAML Configuration' card.
button located on the 'Basic SAML Configuration' card.
Complete the following configuration steps in Azure:
- Click "Add identifier" under Identifier (Entity ID).
- Copy the EntityId from the Hook Security, Inc portal and paste in the text field.
- Click "Add reply URL" under Reply URL (Assertion Consumer Service URL).
- Copy the ACS (Consumer) URL from the Hook Security, Inc portal and paste in the text field, and set Index to 0.
- (Optional) Copy the Single Logout URL from the Hook Security, Inc portal and paste it in the text field under Logout Url (Optional).
- Click "Save".
After saving the basic SAML configuration, you are ready to input the Identity Provider (IDP) settings into Hook Security, Inc.
Hook Security, Inc SSO Configuration
In Azure, you will find the IDP settings needed in Hook Security, Inc under the "Setup {app name}" card.
Complete the following configuration steps in Hook Security, Inc:
- Copy the Azure AD Identifier in Azure into the Issuer URL text field.
- Copy the Login URL in Azure into the ACS Endpoint URL text field.
- (Optional) Copy the Logout URL in Azure into the SLO Endpoint URL text field.
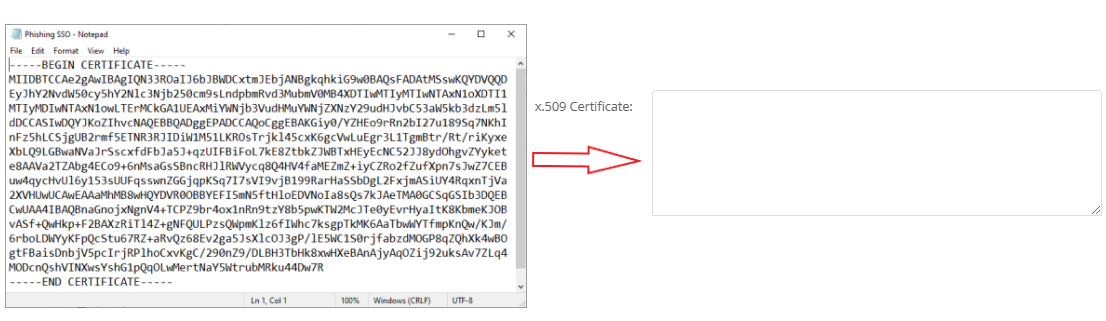
Next, download the 'Certificate (Base64)' from the Azure. The download link can be found in the "SAML Signing Certificate" card.
NOTE: You may receive warnings that this file can damage your computer from your browser or operating system. You can safely ignore these warnings.
After downloading the file, open it with your preferred text editor and copy all the contents. Then, paste them into the 'x.509 Certificate' field under Identity Provider (IDP) Settings in Hook Security, Inc.
After completing the steps above, you can deploy the application to users in Azure which they can then use to sign-in to the phishing or training portals via the Office portal.
Deploying the application to users
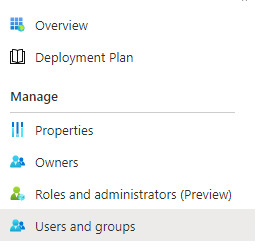
To assign users to the application, click the "Users and groups" link in the Azure application's nav bar.
Click the 'Add user/group' button located at the top of the users table.
![]()
This will open the Add Assignment page. Here, click "None Selected" under Users and Groups and select users/groups to assign the SSO app to. Once you're finished selecting users/groups, click "Select".
NOTE: Depending on your Office plan, you may not be able to deploy the application to groups. Please refer to Microsoft's documentation for more information.
After adding users/groups, users can find the app(s) in the Office portal by clicking the App Launcher button and then 'All apps'. The app(s) can be found by searching all of their apps or in the 'Other' section of the app navigation. Simply clicking the app icon will log them into the service.
In addition to this, you can copy the "User access URL" for the SSO app in the app's properties (Enterprise applications > Find and click the SSO app > Manage > Properties) and share it to users/students:
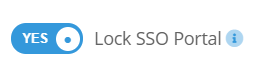
SSO Lock
If enabled, administrators can log in to the portal via SSO only. If the SSO configuration fails and administrators can no longer log in, you will have to contact support in order to disable this feature.