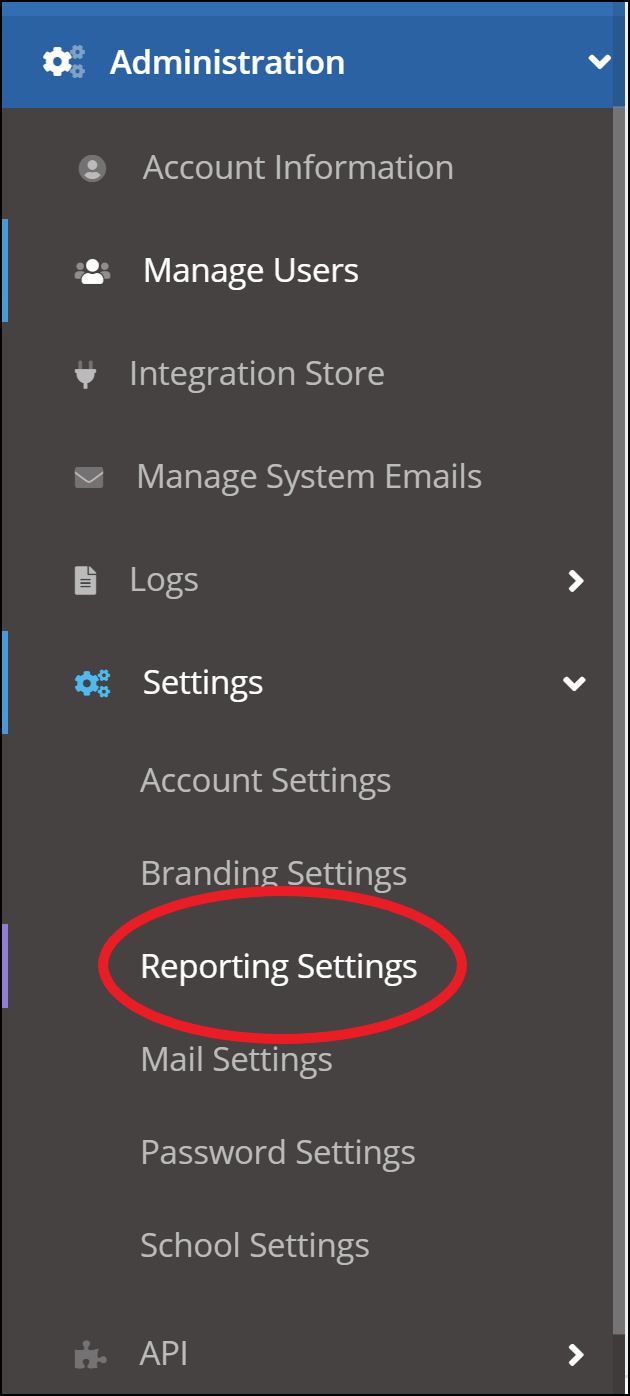
- Accessing Reporting Settings
- General Reporting
- Microsoft Add-In (KillPhish/HookMail)
- Outlook Add-In
- Reporting via Email Forwarding
- Manual Reporting
Accessing Reporting Settings
You can manage your KillPhish add-in and Report Phishing COM add-in settings, view installation instructions, and download the manifest or MSI file from the Reporting Settings page. Navigate to Administration > Settings > Reporting Settings (or Inbox/Reporting Settings, if you have the Inbox module with your Portal subscription).
You will be presented with three different tabs, shown below. (You'll have an additional tab if you have the Google Workspace/Gmail add-in feature).
- Note: The Office (Microsoft) 365 Add-In (KillPhish) tab has settings for the KillPhish plugin. The Outlook Add-In tab has settings for the Report Phishing Outlook desktop plugin (aka COM add-in). These two plugins are NOT the same. The Report Phishing COM add-in will only appear on the Outlook desktop app, only works with 64-bit Outlook app running on a 64-bit Windows machine, and is available for Office (Microsoft) 365 as well as non-Office (Microsoft) 365 accounts; the KillPhish add-in will appear on desktop, OWA, and Outlook for iOS and Android and is only available for Microsoft/Office 365 accounts. The Report Phishing add-in is a simple "click and report" plugin - it does not do advanced scanning. The KillPhish add-in can scan and score an email, which can be disabled (see Microsoft Add-In (KillPhish) below).
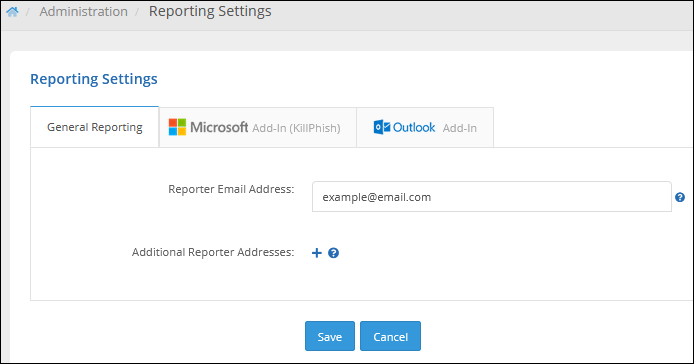
General Reporting
The Reporter Email Address is the email address that receives the reported emails when your users report an email using the add-ins. You may allow additional mailboxes to receive copies of the reported emails by adding Additional Reporter Addresses.
Note that if you are using the Outlook desktop Report Phishing COM add-in, you will need to configure inbox connection on the Mail Settings page in order for the Additional Reporter Addresses to receive copies of reported emails and for reported actions to be logged on simulated phishing tests. The Additional Reporter Addresses will not be sent the EML file when reporting using the Outlook desktop COM add-in, but they will receive the EML file if you are reporting using the KillPhish add-in (if you turn on the "Include Message Body as an Attachment in Reported Emails" setting).
Microsoft Add-In (KillPhish)
The next tab, Microsoft Add-In (KillPhish), contains a table of KillPhish add-in instances (1), instructions for deploying KillPhish (2), and a link to deprecated KillPhish settings (3).
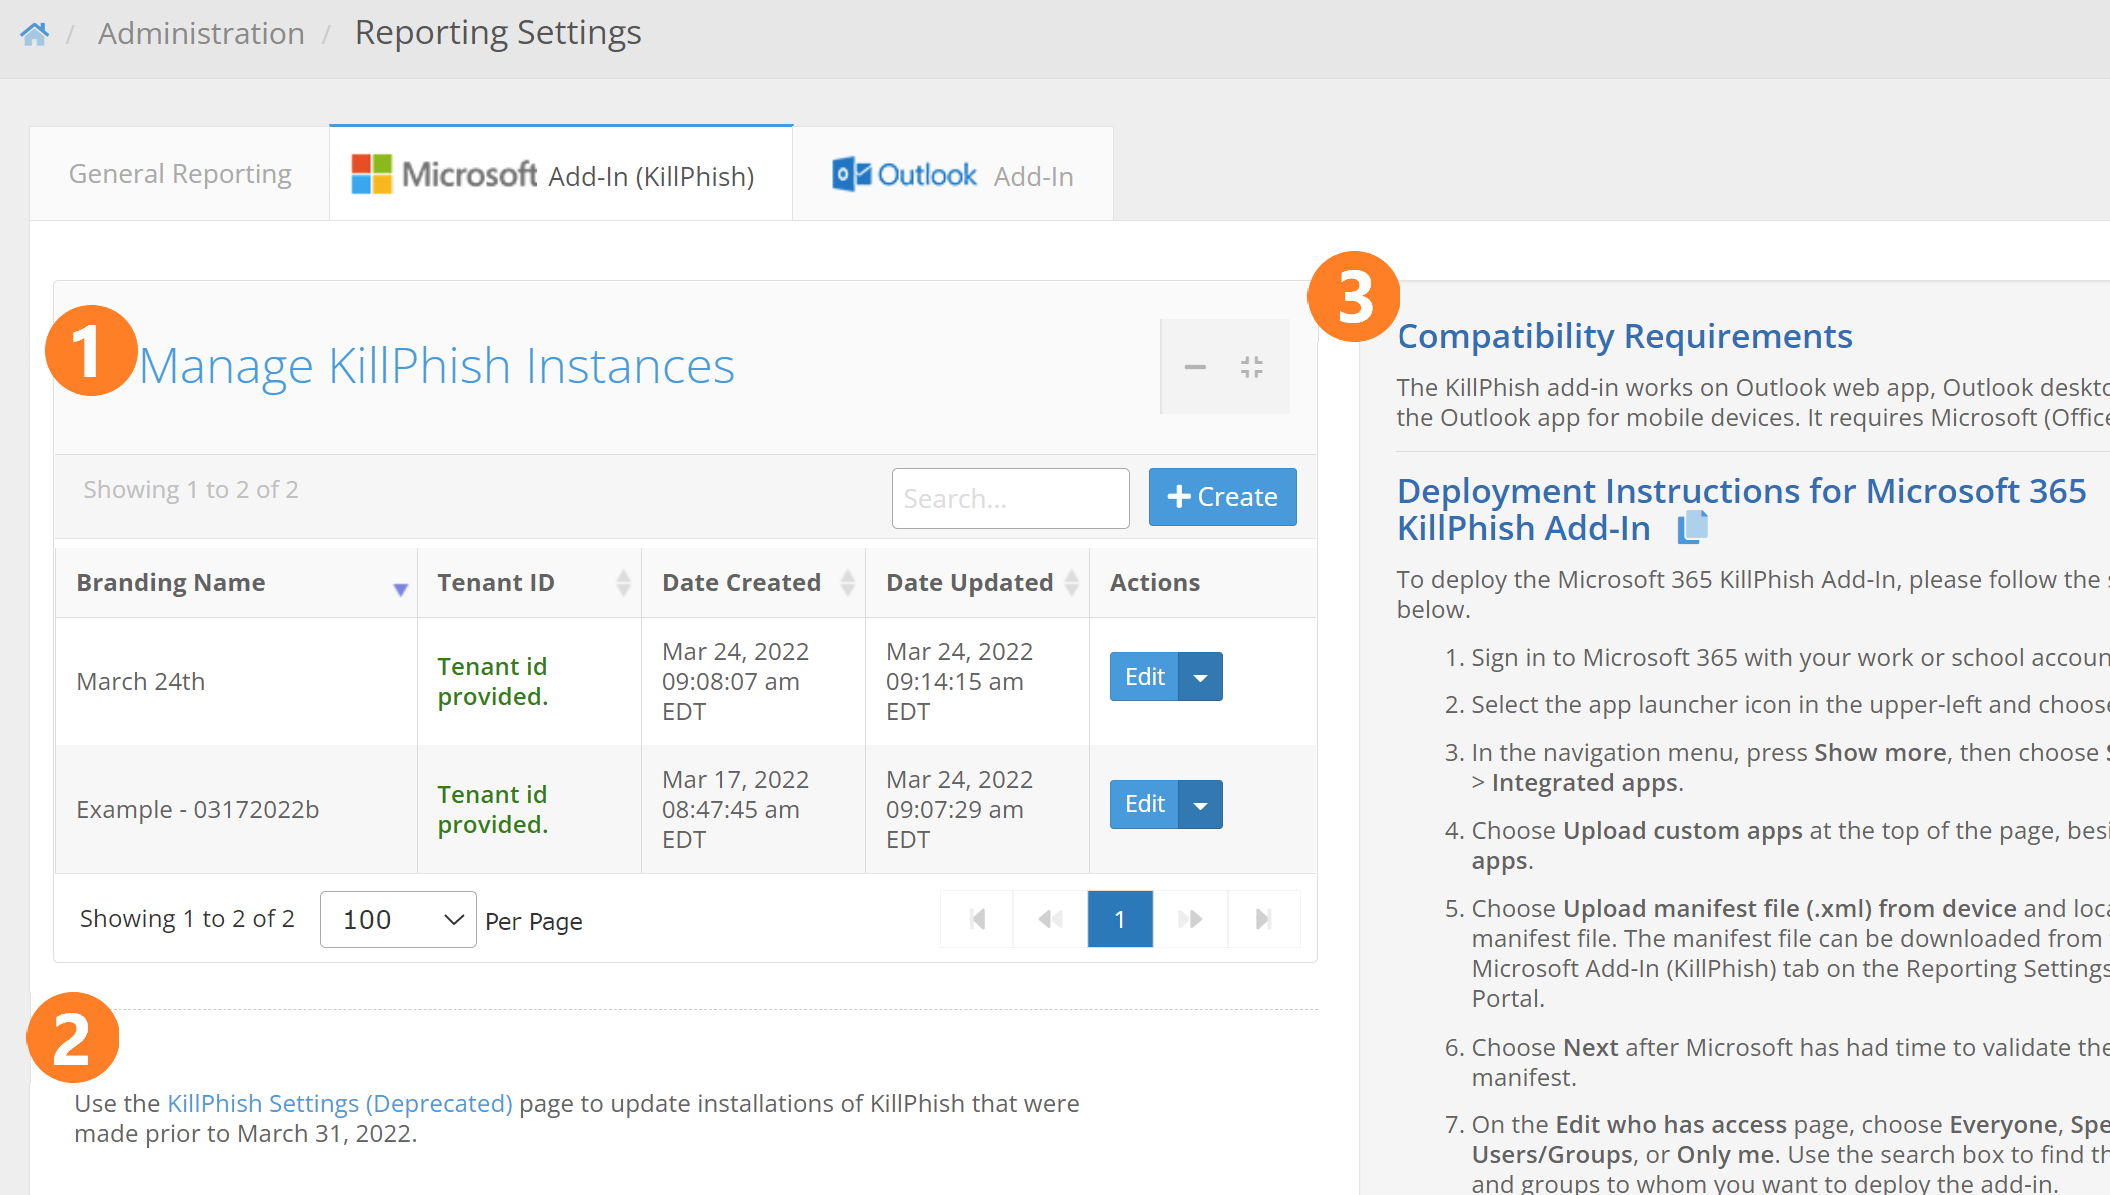
Each section is described below.
- Manage KillPhish Instances - This is a table holding the different instances of the KillPhish add-in associated with your account. A "KillPhish instance" is a manifest file that can be uploaded to a Microsoft account. Each KillPhish instance can be associated with an inbox connection from the Mail Settings page (if you have the Inbox feature), or a reporter email address. You can customize the settings for each instance of KillPhish by clicking the Edit button (described in detail below). The Branding Name column shows the name that will appear on the add-in instance when it is deployed (note: changing the branding name or branding icon will require redeploying the add-in for the change to appear on a previously deployed add-in). The Tenant ID column shows if the tenant id of the Microsoft account that the add-in is installed on has been entered for the KillPhish instance. This tenant id must be entered in order for the add-in to work on mobile devices (providing the tenant id allows the add-in to use application permissions to make API calls, which will be required when using the add-in on mobile devices). The latest build of KillPhish (released April 5, 2022) uses Microsoft Graph API to get message contents, send reported emails from the users' inboxes, and delete emails. These API calls require Mail.ReadWrite, Mail.Send, and User.Read permission at both the delegated and application level.
- Link to Deprecated KillPhish Settings - Clicking this link will take you to a page that lets you modify settings for any installations of the KillPhish add-in that were deployed prior to April 5, 2022. After April 5, 2022, you will use the settings and manifest files from the Manage KillPhish Instances table.
- Compatibility Requirements and Deployment Instructions - This box shows the compatibility requirements of the KillPhish add-in. It also gives installation instructions.
Clicking the Create button will allow you to add a new KillPhish instance. Clicking the Edit button for one of the KillPhish instances will cause a popup to appear that will allow you to modify the settings for a KillPhish instance.
These are settings that relate to the way a reported message will appear when it is sent to the Reporter Email Address and the Additional Reporter Addresses. See this article for an example of a reported email. When you've entered the necessary settings and click the "Save" button, the "Consent for KillPhish to use Microsoft Graph" and manifest file links will both become clickable.
Branding Name - The add-in name that will appear on users' inboxes.
Inbox Connection dropdown - This dropdown will appear if your account has the Inbox feature. Associating the add-in with one of the inbox accounts will make it pull from that account's safelist and blocklist. Reported messages will be sent to the account.
Reporter Email Address - The email address that will receive the messages when your users report them. The Additional Reporter Addresses (set on the General tab) will also receive copies of reported emails.
Tenant ID - The tenant id of the Microsoft account that the add-in was deployed to. This can be found by logging into portal.azure.com and clicking on the Azure Active Directory button. Without the tenant id, KillPhish will work on OWA and Outlook desktop only (not on Outlook for Android or iPhone).
Helpful Tips - This box allows you to create your own helpful tips that will appear on your user's instances of the KillPhish add-in. You are allowed to enter seven or fewer helpful tips. All helpful tips combined may not total more than 350 characters in length. Enter the helpful tips as plain text, each new tip on a new line. If you delete the helpful tips and do not enter anything in the text box, then Portal will place default helpful tips on the user's add-in.
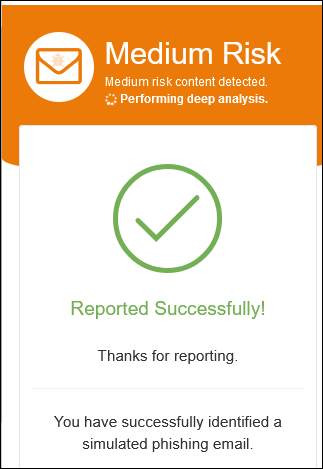
Reported Success Message - A message that will appear on the plugin after a user successfully reports an email. You can enter up to 200 characters of text for the reported success message. This setting is optional. If you leave it blank in your reporting settings, the users will only see the green "Reported Successfully!" popup.
Simulated Phishing Email Reported Congrats Message - A message that will appear below the Reported Success Message if the target reports a Portal simulated phishing email.
Delete Reported Emails - Turning this option on will cause the email that a user reports to be removed from their inbox.
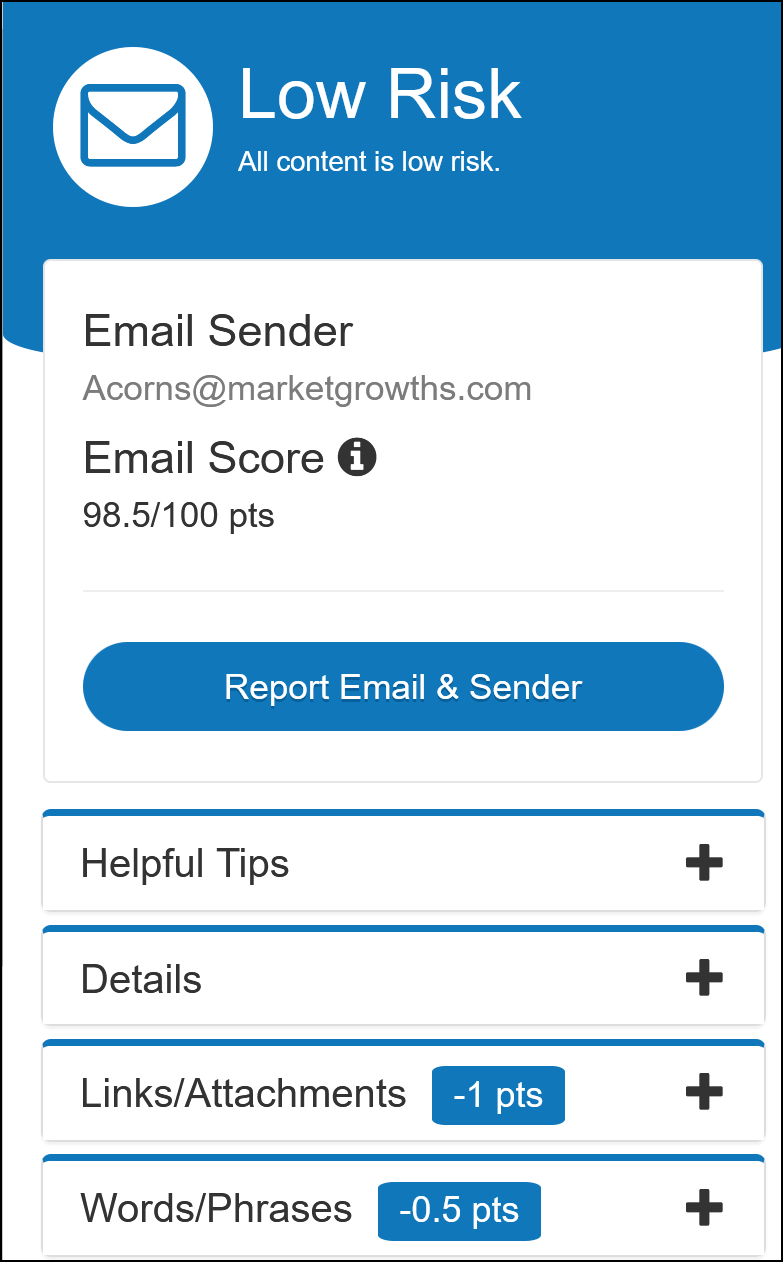
Advanced Threat Protection - Turning this option will cause the emails to be scored. Additionally, information about the email (sender, SPF, links, attachments, words, and phrases) will be displayed, as shown below.
* Disclaimer: Users should remain vigilant against email security threats, even if the Advanced Threat Protection feature is turned on in your plugin. ATP is not capable of detecting every social engineering/phishing threat in emails. You should use the other tools that Portal provides to educate your users about the various threats posed by phishing and social engineering, and how to detect these attacks.
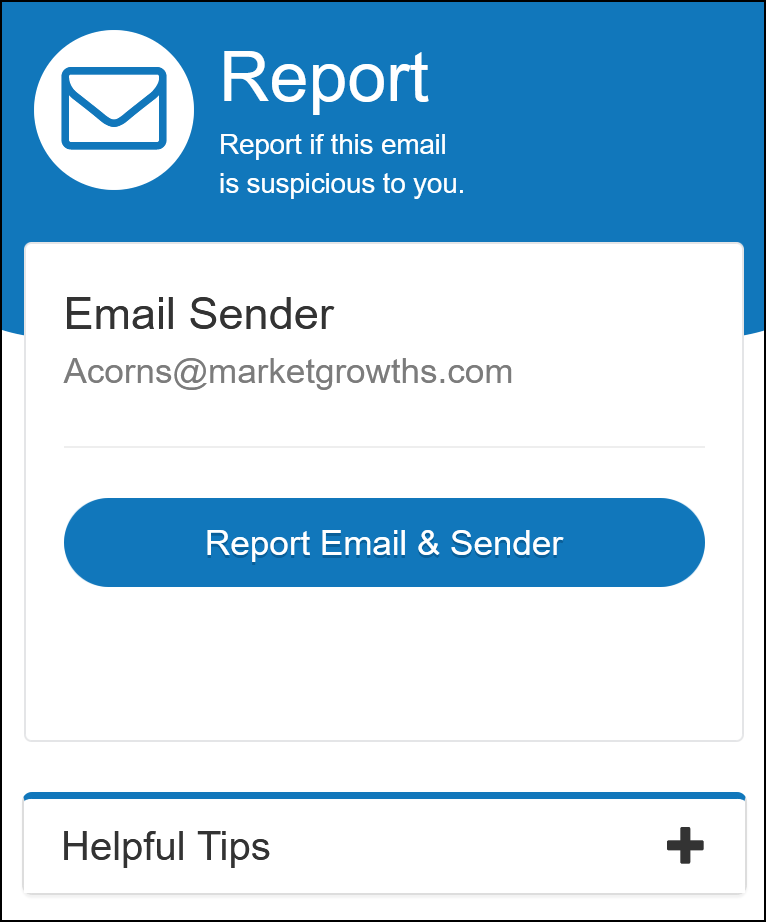
If Advanced Threat Protection is turned off, then only the helpful tips will be displayed. No score or risk assessment will be shown to the user, as shown below.
Include The Blue Box in Reported Emails - If turned on, The Blue Box (a summary of information about the reported email) will be included in the reported message.
Include Message Body as an Attachment in Reported Emails - If turned on, the reported message will be included as an EML attachment in the email that is sent to the Reporter Email Address. The EML attachment is a combination of the message body with the headers of the reported email. If enabled, it may take a few minutes longer for the reported email to arrive in the inboxes of the Reporter Email Address and the Additional Reporter Addresses.
Include Message Body below The Blue Box - This option will display the original message body in the body of the reported email.
Include Message Headers in Reported Emails - This option will create a .txt file attachment containing the original headers of the reported email.
Number of days Portal will store large EML files and attachments - This is how long (in number of days) the large attachments will be retained on the Portal server. When users report an email that contains attachments that are larger than 3 megabytes in size, those will not be attached directly to a reported email. Instead, the attachments, as well as the EML file, will be stored on the Portal server and a link to download those attachments will be provided in the Blue Box. If you don't want these attachments to ever be removed, enter a negative number (the attachments are, by default, never removed).
Send Simulated Phishing Emails to Reporter Addresses - This option allows you to specify what happens to simulated phishing emails that are reported by targets. If this toggle is turned on, then these emails will be sent to the Reporter Email Addresses when targets report them. If it is off, then these emails are not sent anywhere. Reported actions will still be logged on phishing tests either way.
Branding Icon - The icon that will appear for the add-in (this is what users will click to get the plugin to scan the email and allow them to report).
Default Plugin Color - The plugin theme that will be displayed for low risk emails. This is also the theme to be used if ATP is turned off.
Default Plugin Color for Medium Risk Emails - The plugin theme that will be displayed for medium risk emails (not applicable if ATP is turned on).
Default Plugin Color for High Risk Emails - The plugin theme that will be displayed for high risk emails (not applicable if ATP is turned on).
Manifest File - This link can only be clicked if the KillPhish instance has been saved. Clicking this link will allow you to download the XML file to install on your Microsoft account.
For more information on KillPhish, see the article Microsoft Add-In (KillPhish).
Note: You will need to redeploy the manifest file in order for changes to the branding name or branding icon to appear on the KillPhish add-in. Changes to any other settings will not require redeployment of the add-in.
Outlook Add-In
Click on the Outlook Add-In tab to view settings for the Report Phishing plugin.
Advanced Threat Protection is not available for the Report Phishing desktop plugin. The Delete Emails Reported feature is only available for the Report Phishing plugin - not the KillPhish plugin. What Delete Emails Reported does is causes emails to be immediately deleted from the user's inbox when they report emails using the Report Phishing plugin. The Reported Confirmation is a message that the user receives when he/she reports an email.
The Report Phishing Outlook COM Add-In will send reported emails to the Reporter Email Address, which can be changed from the General Reporting tab. In order for simulated phishing emails to mark as reported, an inbox must be configured for the Reporter Email Address. You can configure an IMAP/OAuth inbox from the Inboxes tab on the Mail Settings page.

Reporting via Forwarding
In addition to the Outlook Report Phishing and Microsoft 365 KillPhish add-ins, your targets can report suspicious emails by forwarding to an IMAP email address that you set up. In order for Portal to log that a target has reported a simulated phishing email via the forwarding method, you will need to configure an inbox. Go to the Inboxes tab on the Mail Settings page. Follow the instructions in Inboxes section of the Mail Settings article on how to set up an IMAP or OAuth inbox.
If you don't want PhishingBox test emails to appear in your primary Microsoft 365 reporter address when using the reporting via forwarding method, you may want to redirect test emails from your primary reporting address in Outlook to another email address. To do this, add the following rule to your mail flow rules.
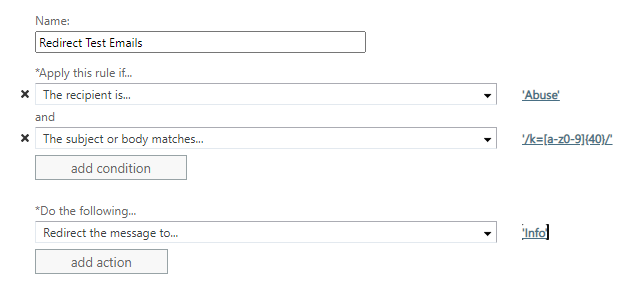
For the 'The Recipient is...' condition, select your firm's primary reporting address.
For the 'Redirect the message to...' action, select the address to which you wish to redirect test emails.
For the 'The subject or body matches...' condition, add the following regular expression: '/k=[a-z0-9]{40}/'
NOTE: We cannot guarantee that Portal will be able to connect to your mail client via IMAP. Please be sure sure to safelist the Portal IP (found in this article) to allow for connections via IMAP. Consult with your mail provider for troubleshooting.
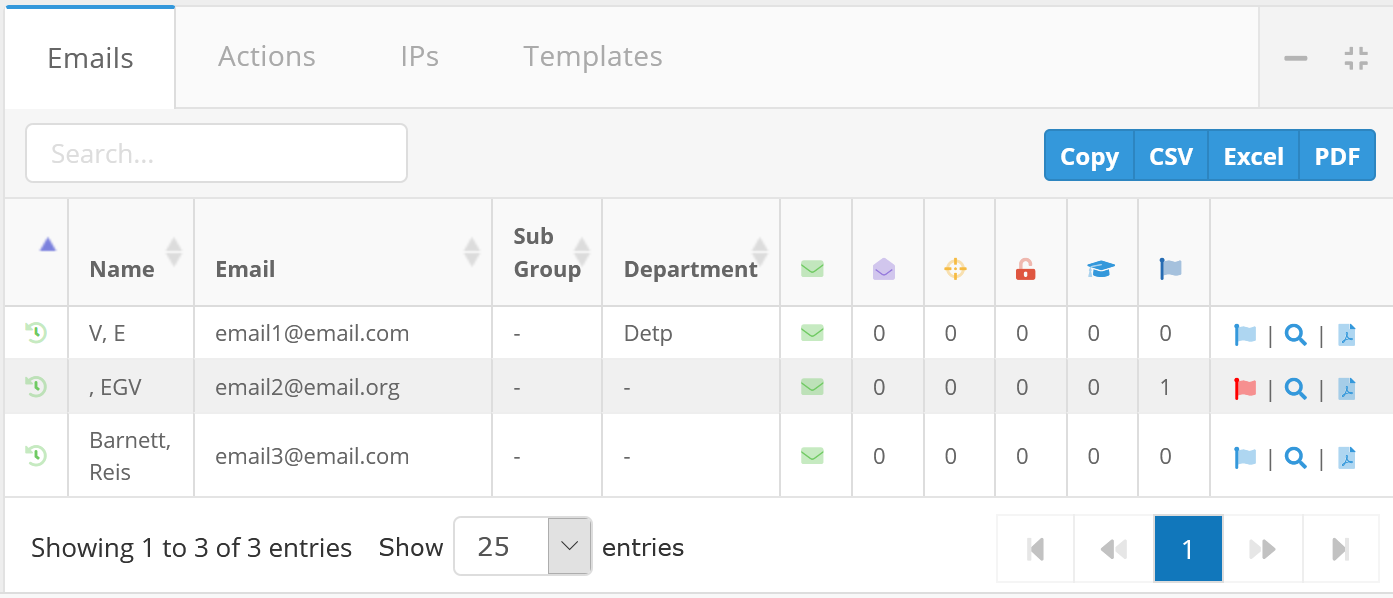
Manual Reporting
As a Portal admin/user, you can manually log that a target reported a simulated phishing email. To do so, go to Tests/Campaigns > Manage Tests. Open one of your tests. Scroll to the bottom. In the Emails tab, click on the blue flag icon for the email and target in question. The blue flag will become red for manually reported phishing emails. This will log that the target reported the email.